Advanced Linux System Administration

Linux System Administration কেন শিখবেন?

বর্তমানে সবচেয়ে জনপ্রিয় এবং ডেভেলপার ফ্রেন্ডলি অপারেটিং সিস্টেম হলো Linux বেইজড অপারেটিং সিস্টেম। আমরা দৈনন্দিন কাজে ইন্টারনেটে যে সকল অ্যাপ্লিকেশন ব্যবহার করি তার একটি বড় অংশ Linux বেইজড সার্ভার থেকে পরিচালিত হয়। এছারাও একজন ডেভেলপার যদি রিয়েল এনভায়রনমেন্টে এপ্লিকেশন ভেডেলপমেন্ট এবং পরীক্ষণের কাজ করতে চায় সেক্ষেত্রে তার Linux বেইজড অপারেটিং সিস্টেম পরিচালনায় পারদর্শী হওয়া প্রয়োজন।

আপনি যদি কোন প্রতিষ্ঠানে Server Administrator/System/DevOps/Network Engineer হিসেবে কাজ করতে আগ্রহী হন আপনাকে অবস্যই Linux বেইজড অপারেটিং সিস্টেম পরিচালনায় পারদর্শী হওয়া প্রয়োজন। এপ্লিকেশন ভেডেলপমেন্ট এর মোস্ট পপুলার টুলস গুলো Linux বেইজড অপারেটিং সিস্টেমে সাপোর্ট করে এবং তুলনামূলক অনেক কম রিসোর্স ব্যবহার করে অনেক বড় প্রজেক্ট রান করা সম্ভব। (যেমন: Android Application Development Tools, eclipse, Laravel, LAMP, LEMP etc.)। নিজেকে একজন দক্ষ System Administrator/System/DevOps/Network Engineer হিসেবে তৈরি করতে চাইলে এই কোর্সে অংশ গ্রহন করতে পারেন।

এই কোর্সটিতে Red Hat Certified System Administrator (RHCSA) এর সকল টপিকস এবং প্রফেশনাল হিসেবে কোন প্রতিষ্ঠানে যে সকল সার্ভার এপ্লিকেশন নিয়ে কাজ করতে হয়, তার প্রায় সবকিছুই পাবলিক সার্ভারে প্রোডাকশন ইনভেরনমেন্ট এ শেখানো হবে।
তাই এই কোর্সটি সফলভাবে সম্পন্ন করলে আপনি যেকোন প্রতিষ্ঠানে (Software Firm, ISP, IT Service Provider, Govt. Organization etc.) একজন System Engineer/Server Administrator/DevOps Engineer হিসেবে কাজ করার যোগ্যতা অর্জন করতে পারবেন এবং যারা ইতোমধ্যে জব করছেন তাদের দক্ষতাকে আরও সমৃদ্ধ করতে পারবেন।
কি কি থাকছে এই কোর্সেঃ 
– সহজ বাংলায় কোর্স নির্দেশিকা।
– Linux সিস্টেমের খুটিনাটি বিষয়ে বিষদ আলোচনা।
– ভার্চুয়াল প্র্যাকটিস এনভায়রনমেন্টে সম্পর্কে ধারনা এবং ভার্চুয়াল এনভায়রনমেন্টে Linux সিস্টেম নিয়ে কাজ করা।
– Linux সিস্টেম এডমিনিট্রেশণের যাবতীয় বিষয়ে ডিটেইলস বর্ননা যেমনঃ Filesystem Management, User Management, Text Editor, Network Management, Package Management, Service Management ইত্যাদি।
– Firewall Configuration
– Linux সিস্টেম এ প্রয়োজনীয় সকল সার্ভার এপ্লিকেশন এর ইন্সটেলেশন এবং কনফিগারেশন যেমনঃ DNS, Web (Apache, Nginx) PHP, MySQL, Mail, Webmail, Server Monitoring ইত্যাদি।
– Linux সিস্টেমে Develoment Tools ইন্সটেলেশন এবং কনফিগারেশন যেমনঃ Code Editor, Android Application Development Tools, eclipse, Laravel ইত্যাদি।
– ক্লাউড কম্পিউটিং এর ধারণা এবং AWS এর ল্যাব প্রদর্শন।
– DevOps এবং অটোমেশন এর ধারণা এবং ল্যাব।
– প্রোডাকশন সিস্টেমে কাজ করার বিভিন্ন ধরনের টিপস তো থাকছেই।

ক্লাস সংখ্যাঃ ২০ টি (মোট ৫০ ঘন্টা) (২.৫ ঘন্টা/ক্লাস, সপ্তাহে ২টি ক্লাস)।

মাধ্যমঃ অনলাইন

প্রয়োজনঃ ভার্চুয়াল মেশিন সাপোর্ট করে এমন কনফিগারেশনের ল্যাপটপ অথবা ডেস্কটপ থাকতে হবে।

📌 রেজিষ্ট্রেশনঃ https://lnkd.in/d_pPyfiW

📌 কোর্স ফিঃ ৬,০০০/-

📌 ক্লাসঃ রবি ও বুধবার (রাত ৯:০০ থেকে ১১:৩০ টা)

📌 যোগাযোগঃ +8801717888859

(ক্লাসের রেকোর্ডিং গুলোতে ১বছরের অনলাইন একসেস দেয়া হবে)

Details Course Outline:
1. Getting Started with Linux
– Linux System Introduction
– Virtualization Basic
– Setup Virtual Environment for the Lab
– Install Linux on Virtual Environment
– Introduction of Network Virtualization
– Networking for Virtual Machine
2. Understand and use essential tools
– File System Hierarchy Standard
– Access a shell prompt and issue commands with correct syntax
– Browsing Directory & Managing Files
– Use input-output redirection (>, >>, |, 2>, etc.)
– Use grep and regular expressions to analyze text
– Access remote systems using SSH
– Log in and switch users in multiuser targets
– Archive, compress, unpack, and uncompress files using tar, star, gzip, and bzip2
– Create and edit text files
– Create, delete, copy, and move files and directories
– Create hard and soft links
– Locate, read, and use system documentation including man, info, and files in /usr/share/doc
3. Managing Users and Groups
– Create, delete, and modify local user accounts
– Change passwords and adjust password aging for local user accounts
– Create, delete, and modify local groups and group memberships
– Configure superuser access
– Ownership and Permission for File & Directory
4. Operate running systems
– Boot, reboot, and shut down a system normally
– Boot systems into different targets manually
– Interrupt the boot process in order to gain access to a system
– Identify CPU/memory intensive processes and kill processes
– Adjust process scheduling
– Manage tuning profiles
– Locate and interpret system log files and journals
– Preserve system journals
– Start, stop, and check the status of network services
– Securely transfer files between systems
5. Configure Network
– IP Address Basic
– Configure IPv4 and IPv6 addresses
– Configure hostname resolution
– Configure network services to start automatically at boot
– Restrict network access using firewall-cmd/firewall
– Configure NTP Client
6.Packages/Software Management
– Install software from local source
– Install software from repository
– Configure Additional repository
– Work with package module streams
– Modify the system bootloader
– Updating the System
7. Create simple shell scripts
– Conditionally execute code (use of: if, test, [], etc.)
– Use Looping constructs (for, etc.) to process file, command line input
– Process script inputs ($1, $2, etc.)
– Processing output of shell commands within a script
– Processing shell command exit codes
8. Configure local storage
– List, create, delete partitions on MBR and GPT disks
– Create and remove physical volumes
– Assign physical volumes to volume groups
– Create and delete logical volumes
– Configure systems to mount file systems at boot by universally unique ID (UUID) or label
– Add new partitions and logical volumes, and swap to a system non-destructively
9. Create and configure file systems
– Create, mount, unmount, and use vfat, ext4, and xfs file systems
– Mount and unmount network file systems using NFS
– Extend existing logical volumes
– Create and configure set-GID directories for collaboration
– Configure disk compression
– Manage layered storage
– Diagnose and correct file permission problems
10. Deploy, configure, and maintain systems
– Schedule tasks using at and cron
– Start and stop services and configure services to start automatically at boot
– Configure systems to boot into a specific target automatically
– Configure time service clients
– Modify the system bootloader
11. Configure remote login
– Install and Configure SSH
– Restrict access for SSH
– Configure password less SSH login
– Install and Configure VNC on Desktop mode
12. Network File/Storage Management
– Install and Configure FTP server
– Install FTP Client and Test the Server
– Securing FTP Server
– Install and Configure NFS Server
– Configure NFS sharing
– Mounting NFS share
13. Manage Security and Firewall
– Configure firewall settings using firewall-cmd/firewalld
– Create and use file access control lists
– Configure key-based authentication for SSH
– Set enforcing and permissive modes for SELinux
– List and identify SELinux file and process context
– Restore default file contexts
– Use boolean settings to modify system SELinux settings
– Diagnose and address routine SELinux policy violations
14. Automatic Network Configuration Server
– Install and Configure DHCP server
– Adding IP address pool to DHCP server
– Bind MAC to lease IP Address
– Configure Static IP address for particular MAC
15. Network Time Server
– Install and Configure NTP server
– Configure NTP client
– Verify NTP working or not
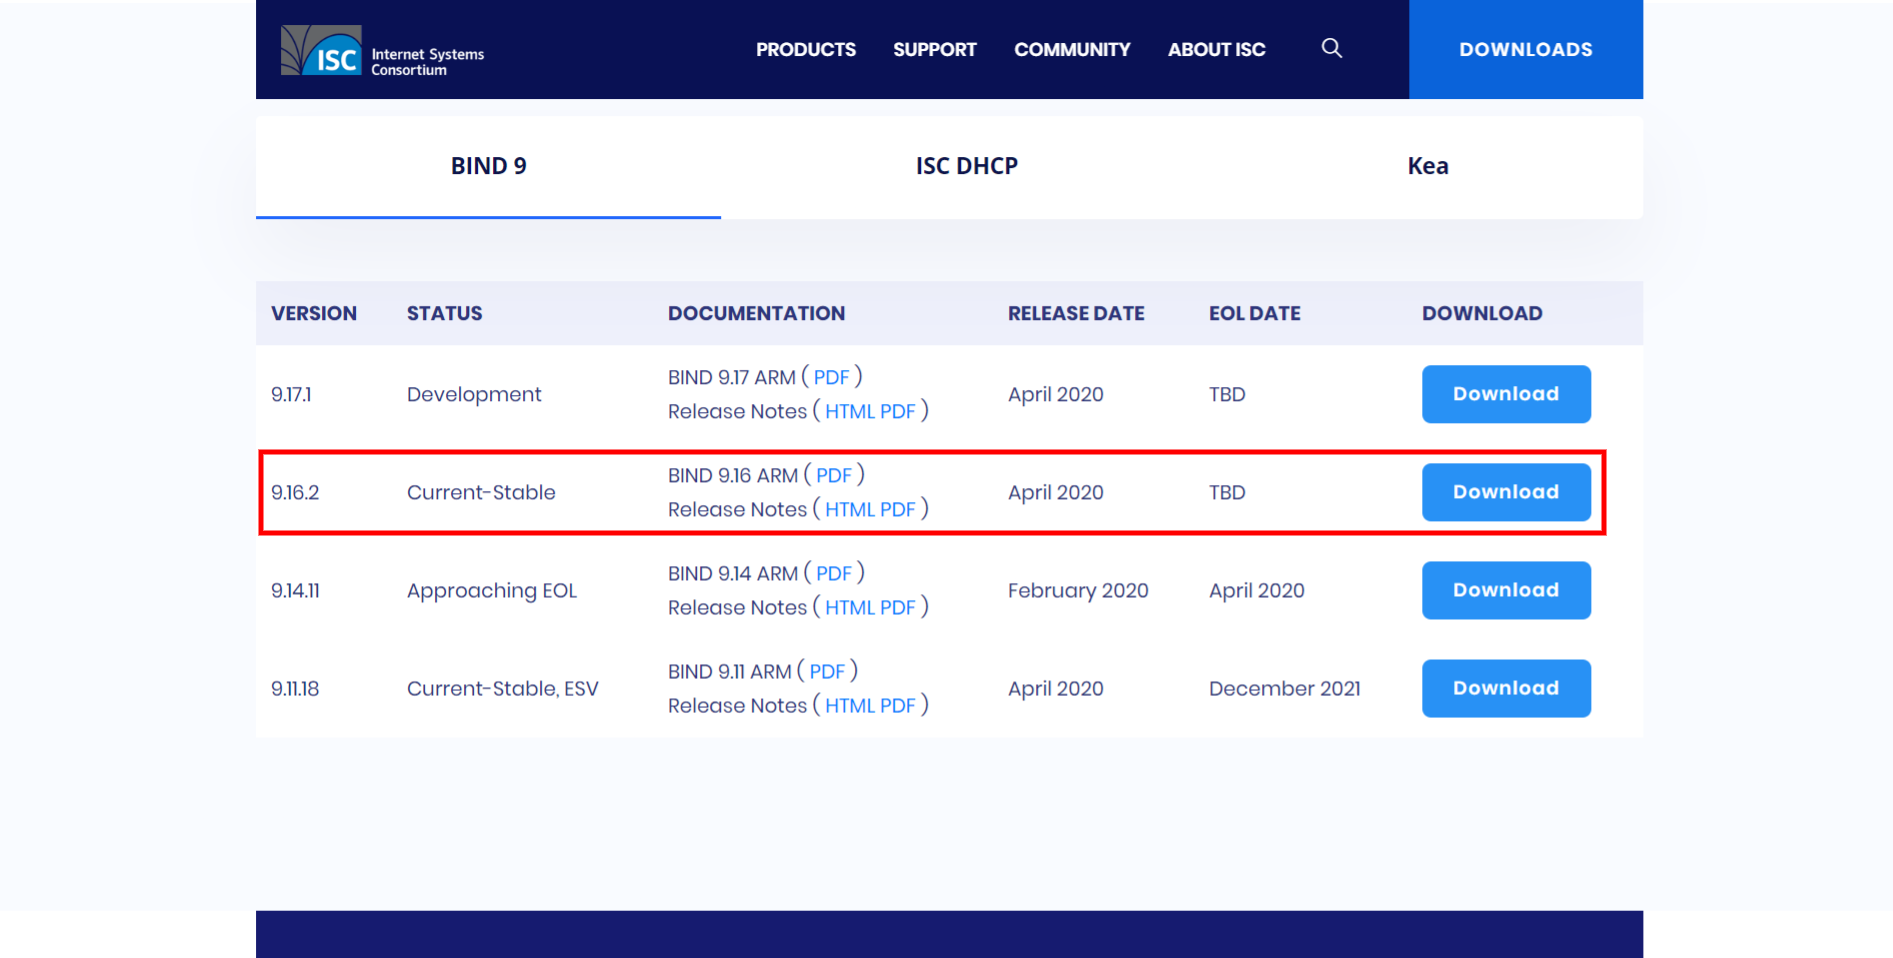
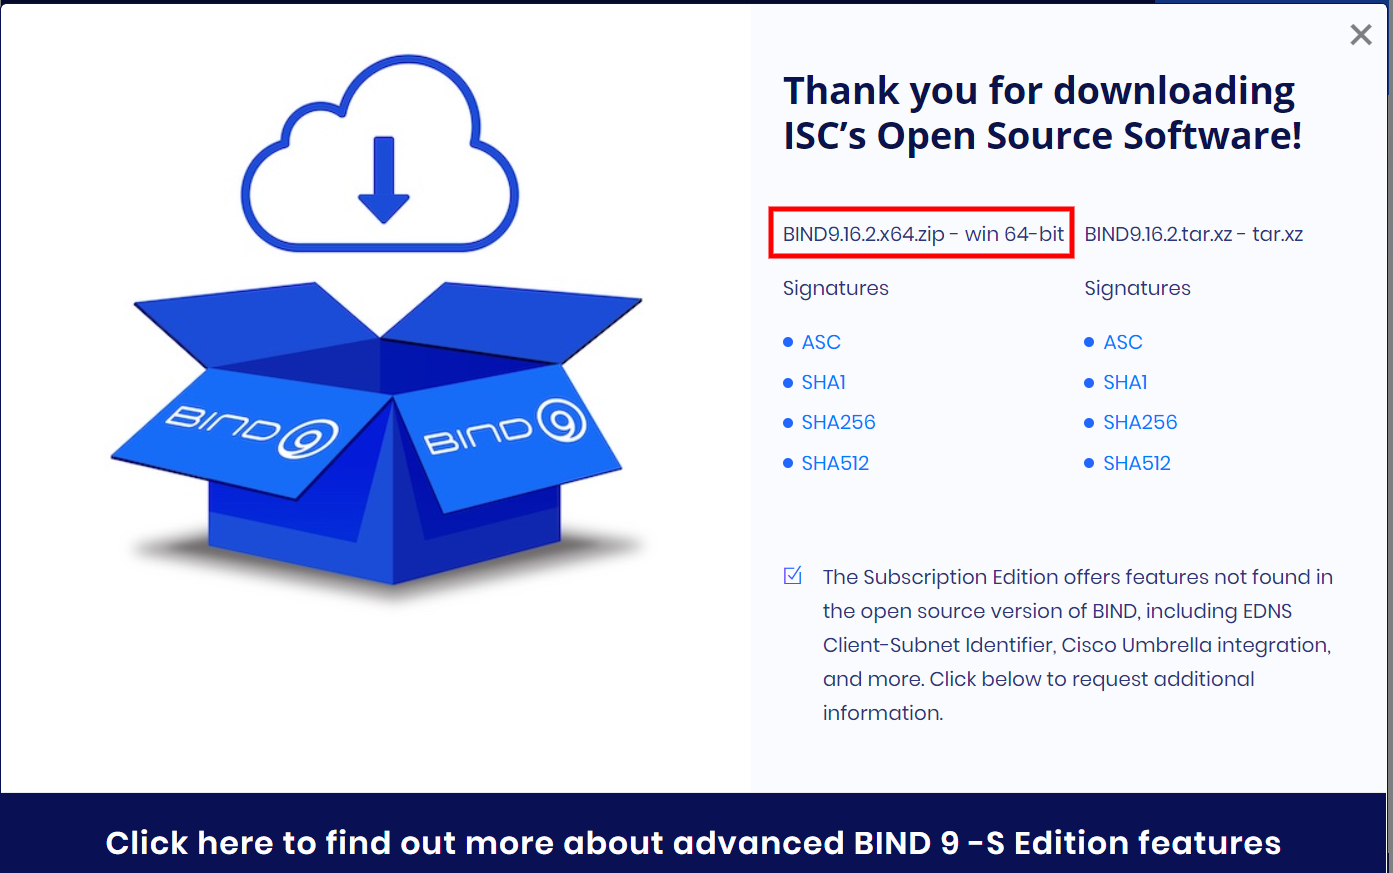
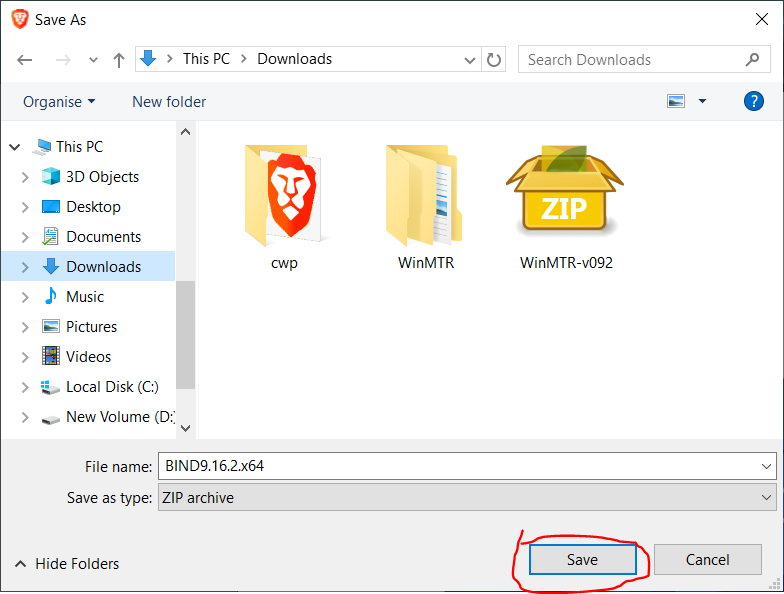
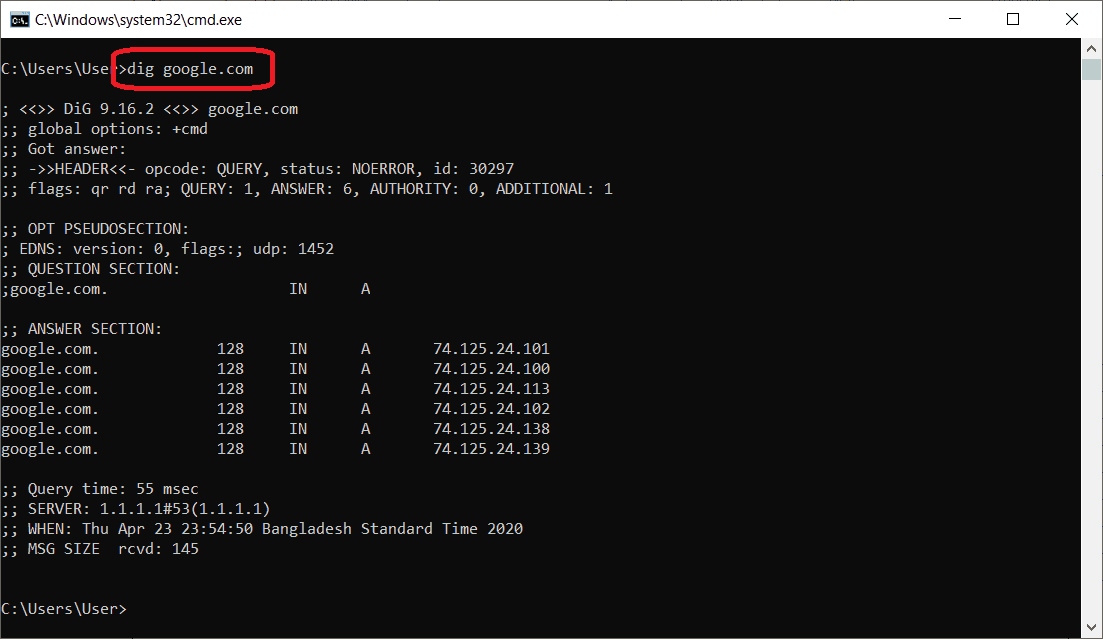
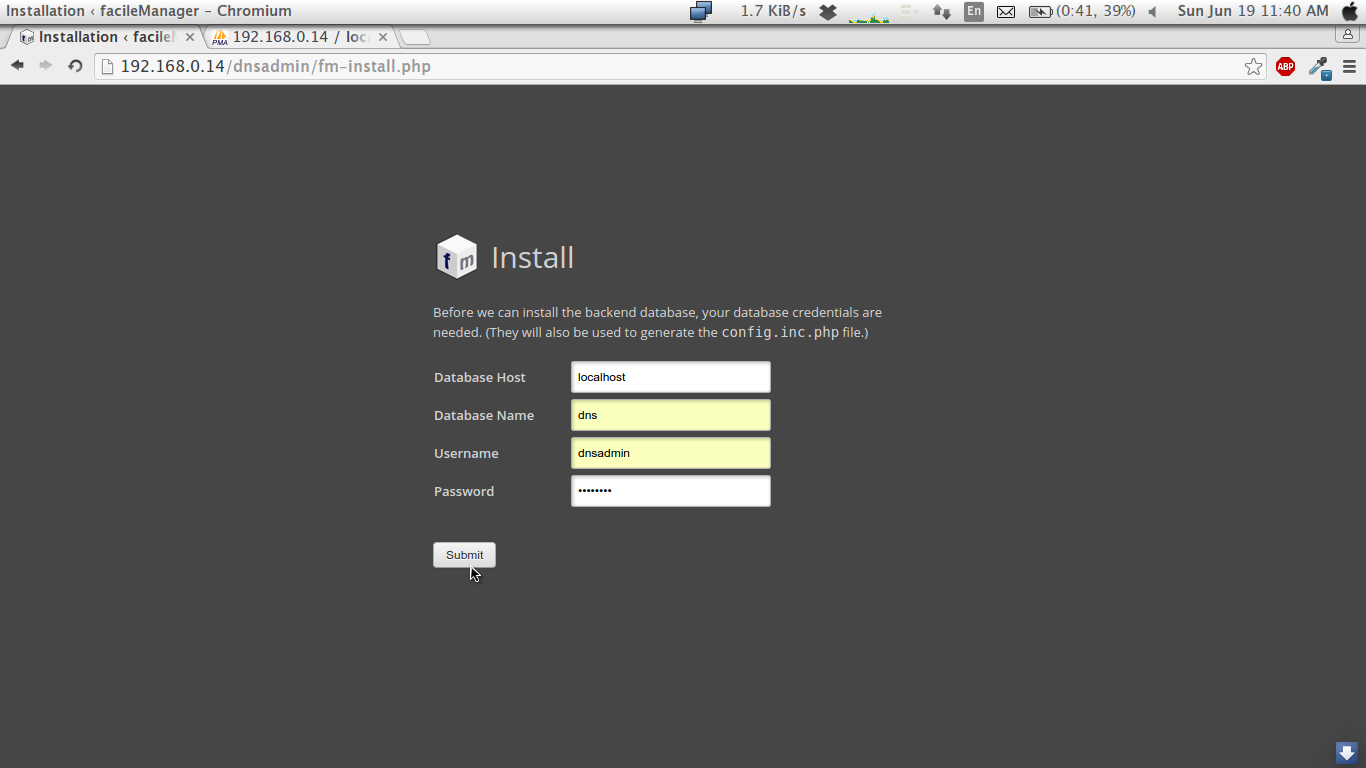
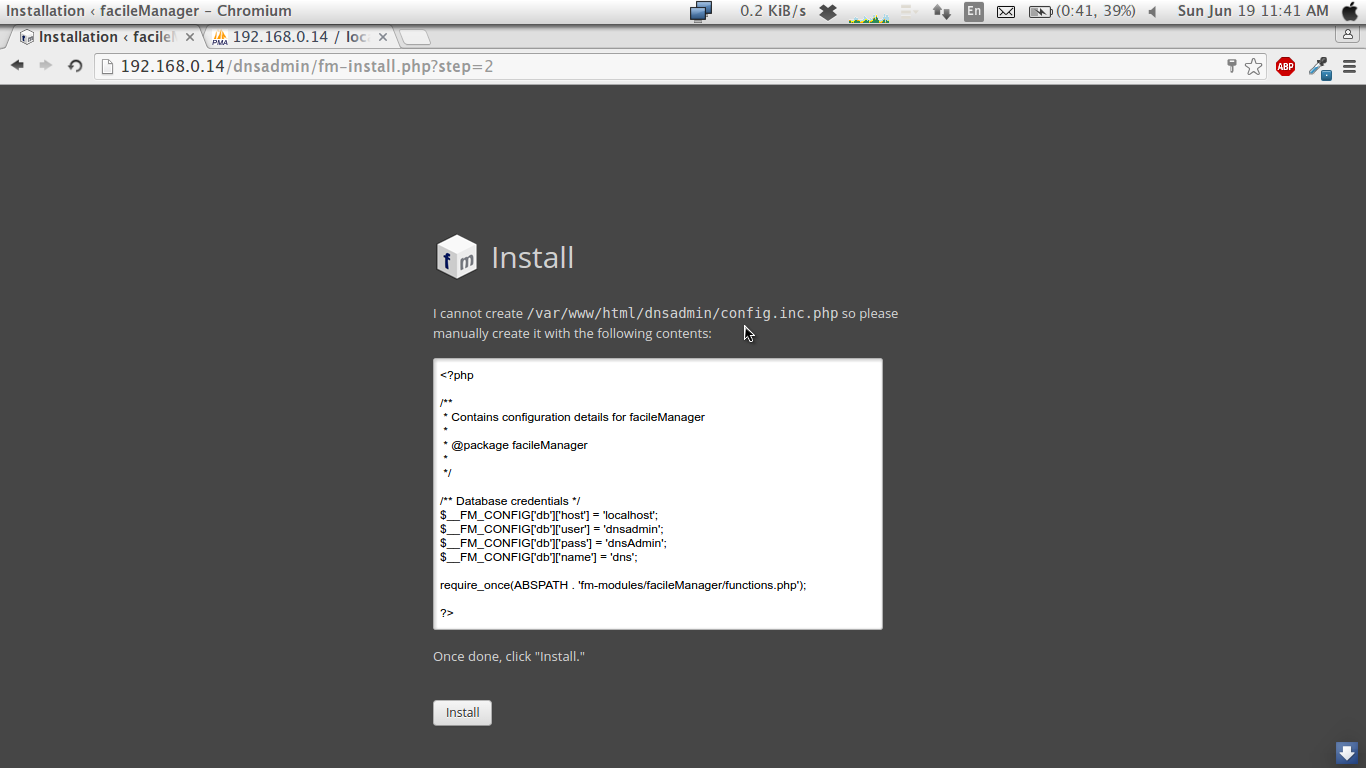
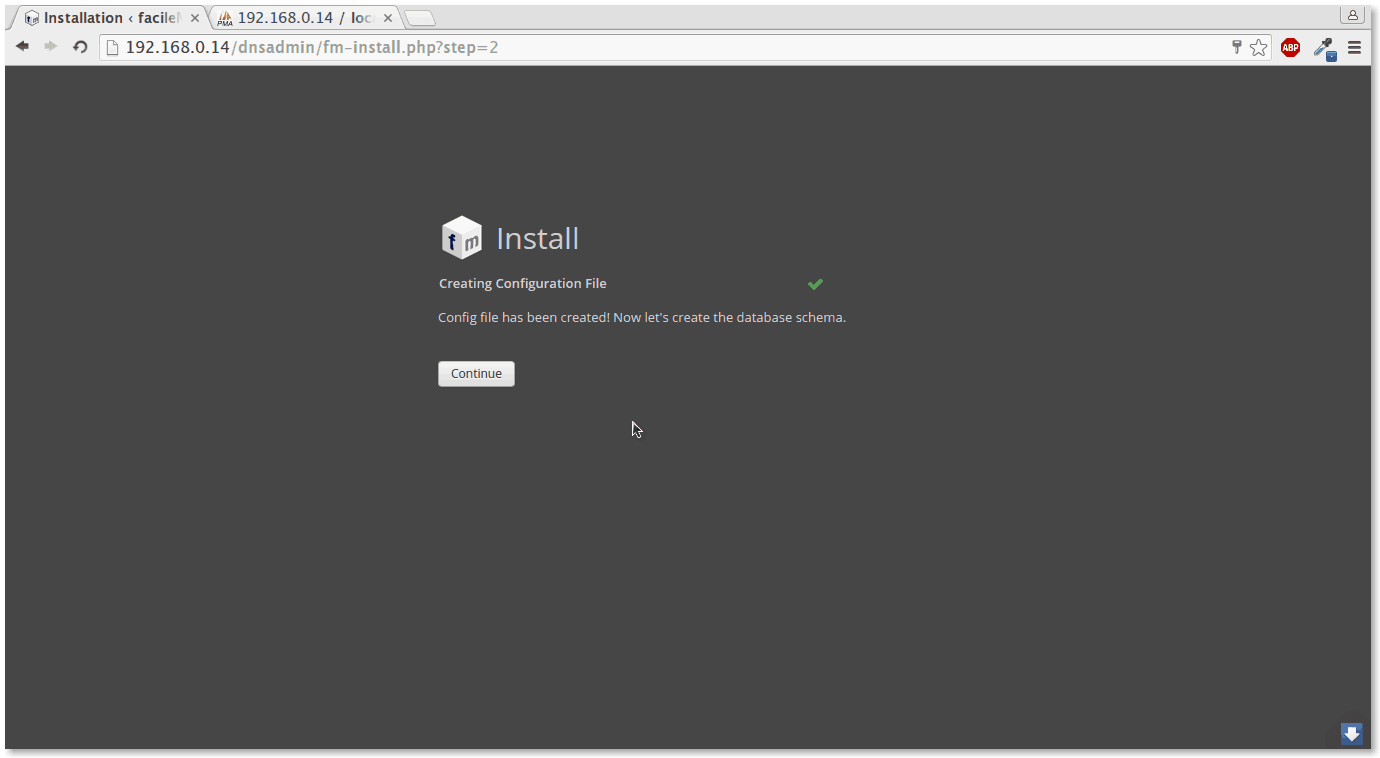
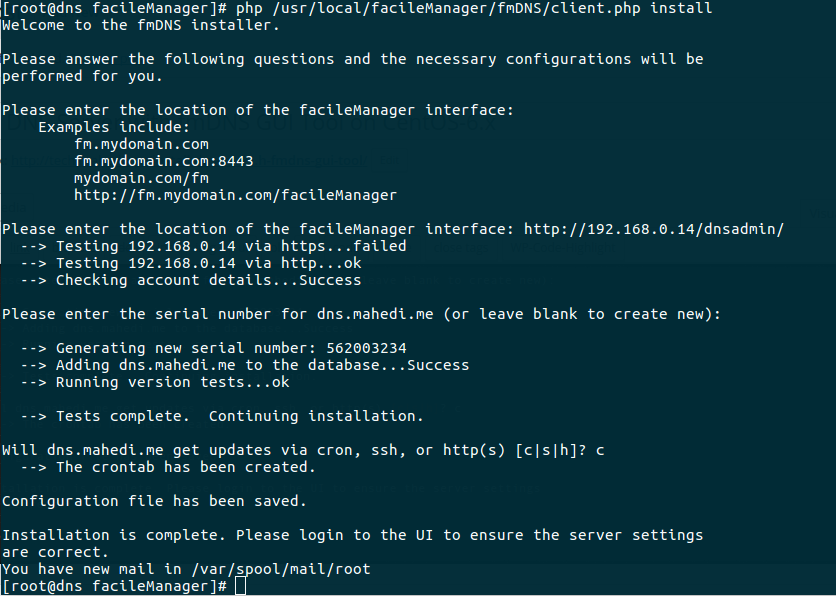
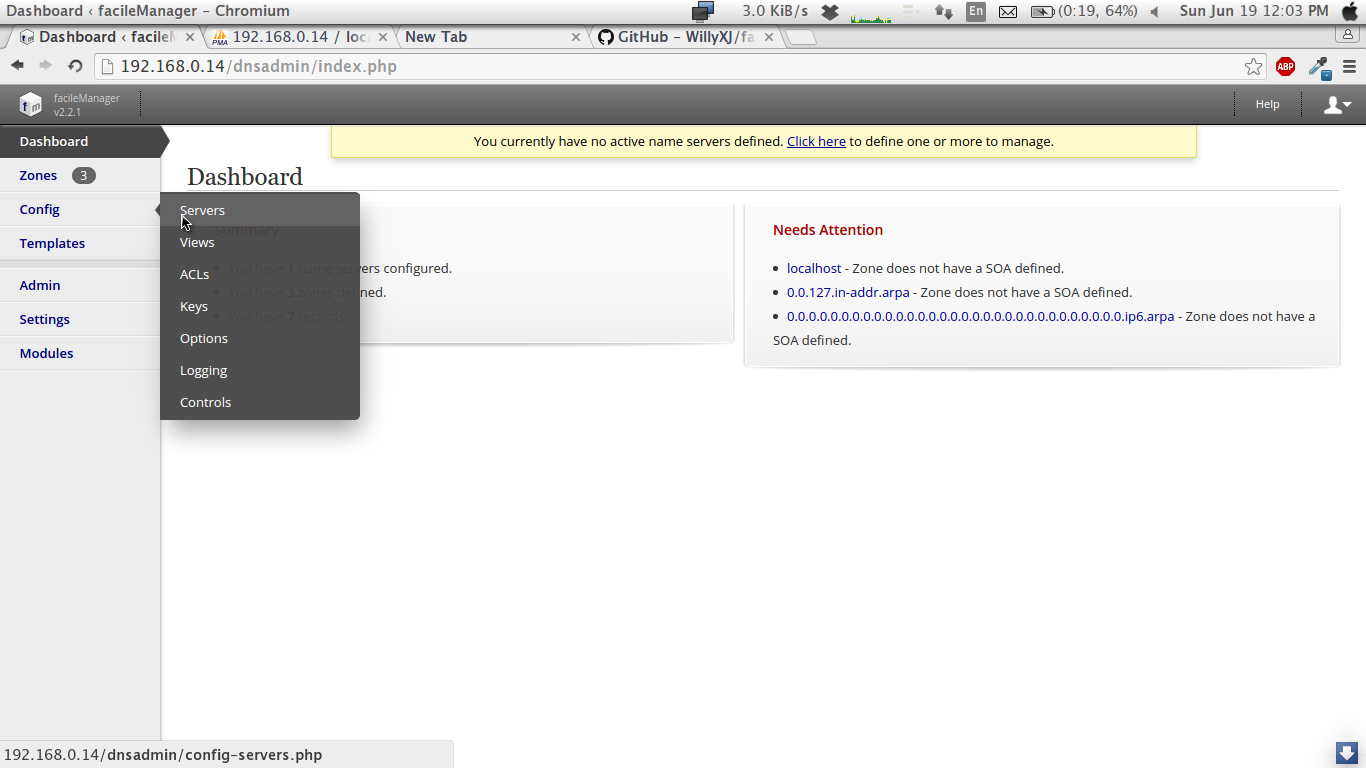
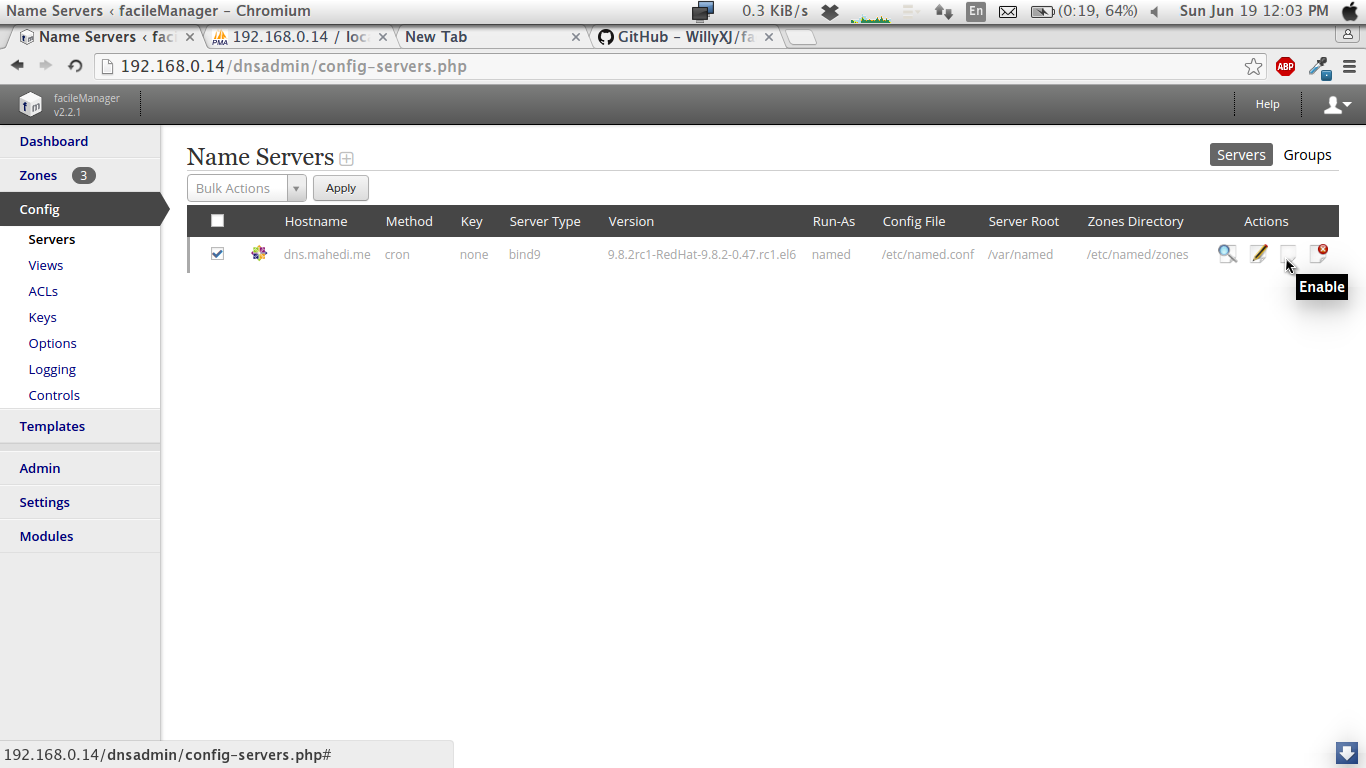
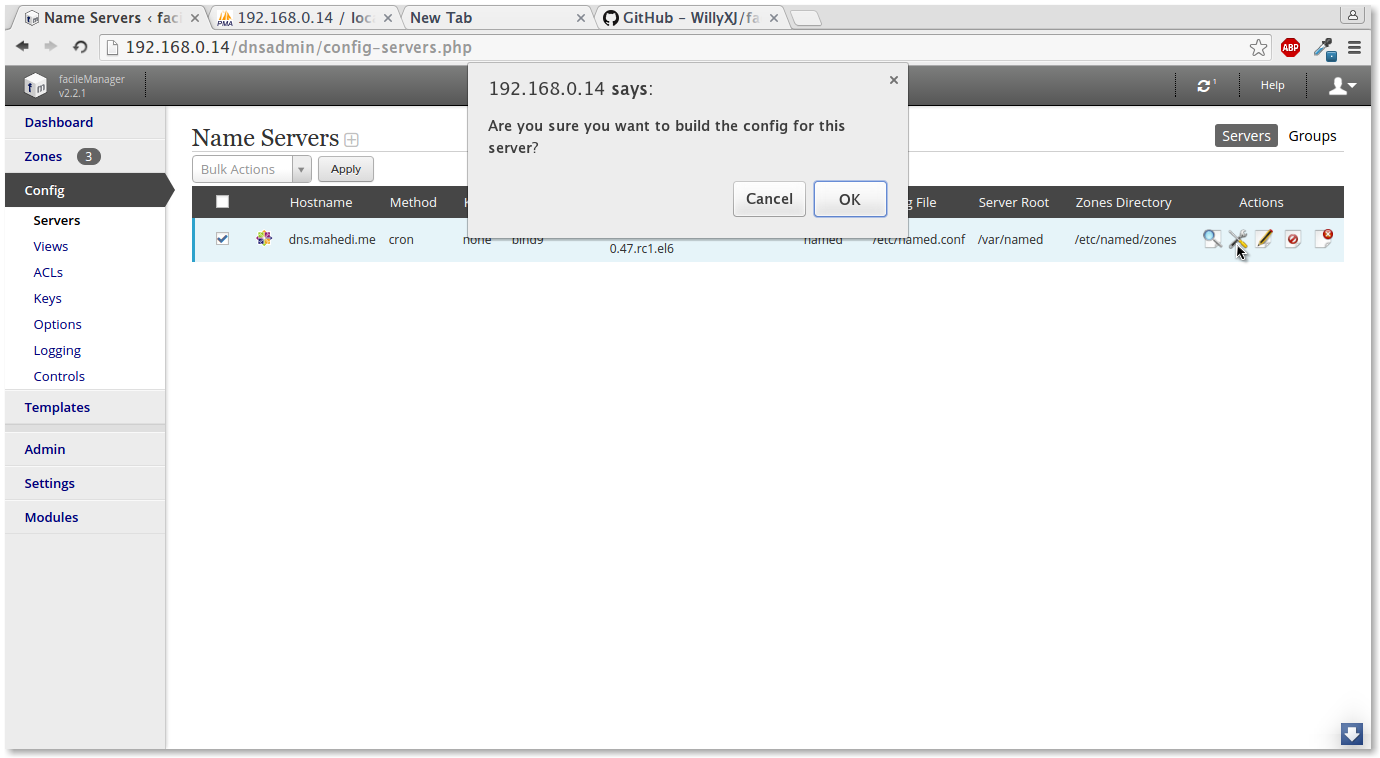
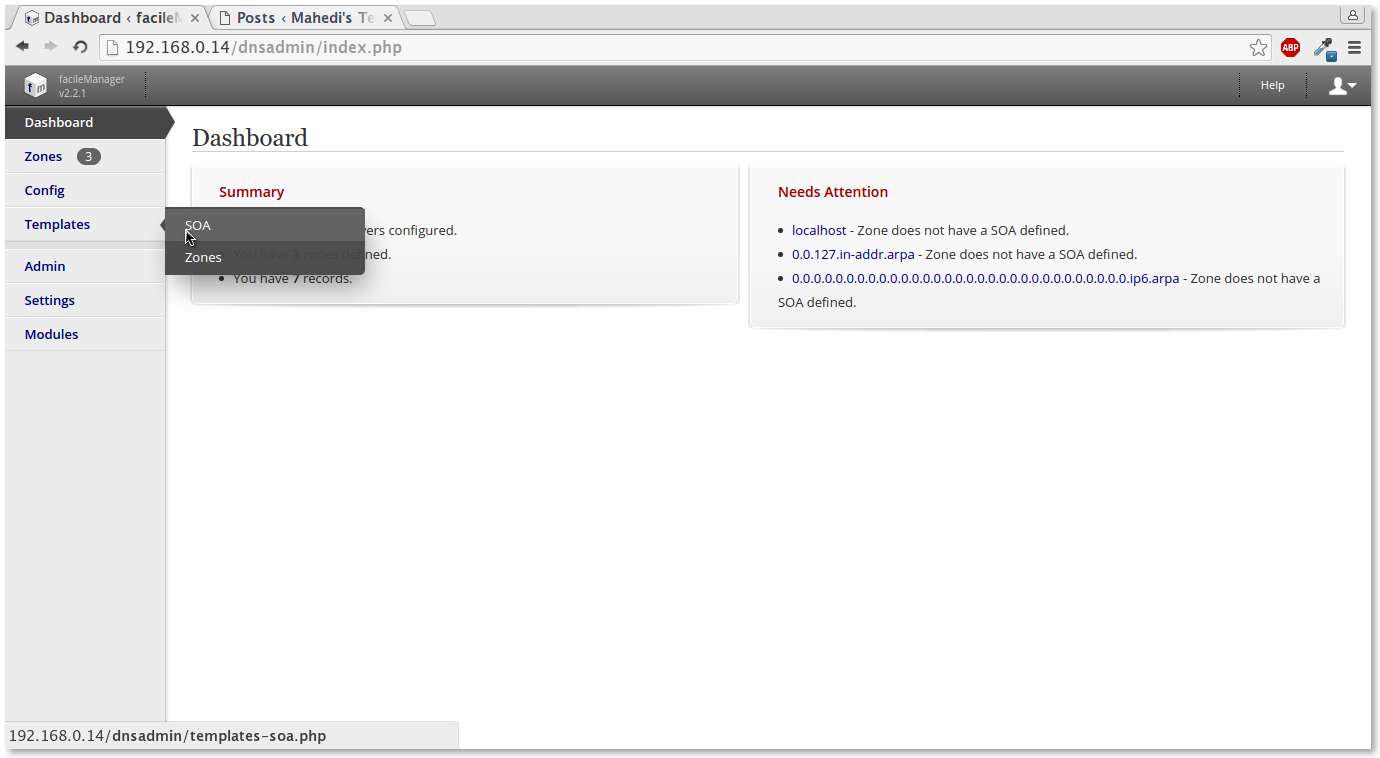
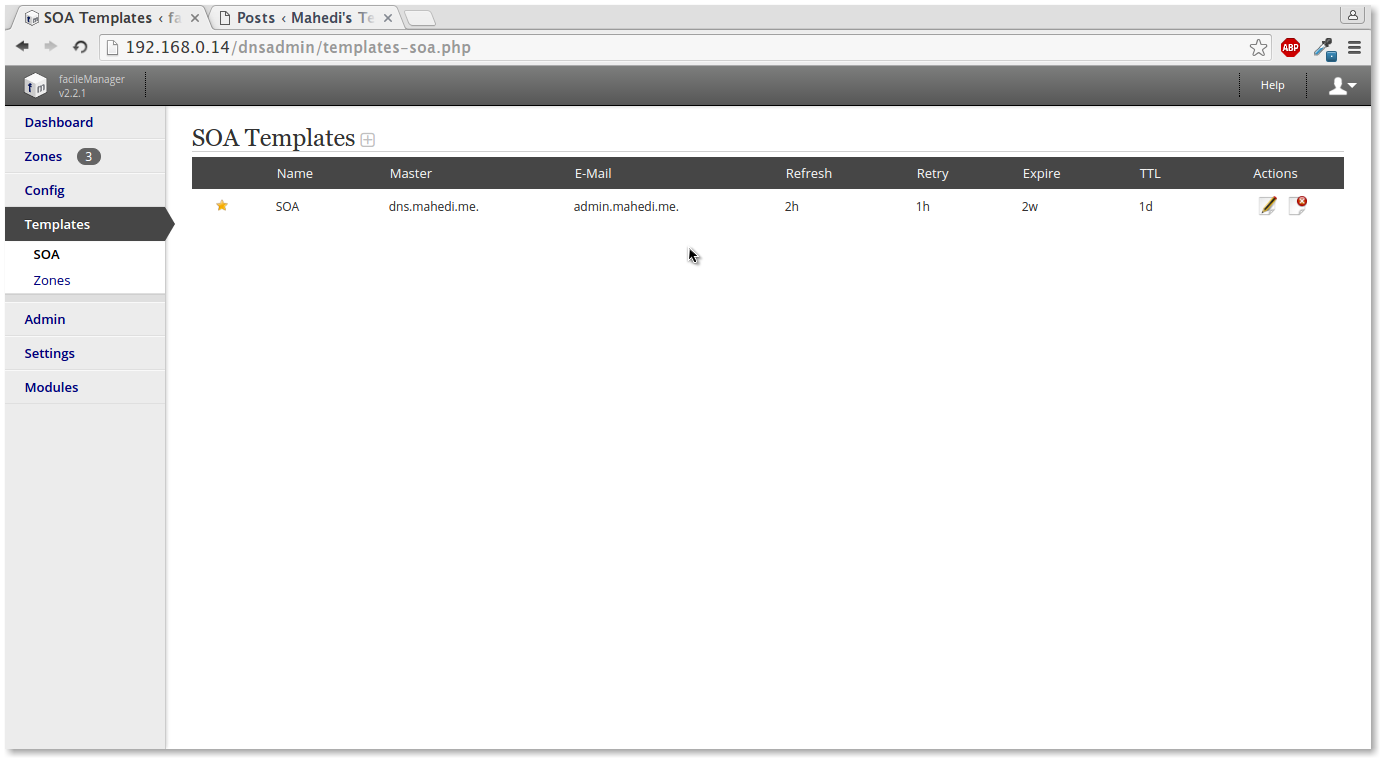
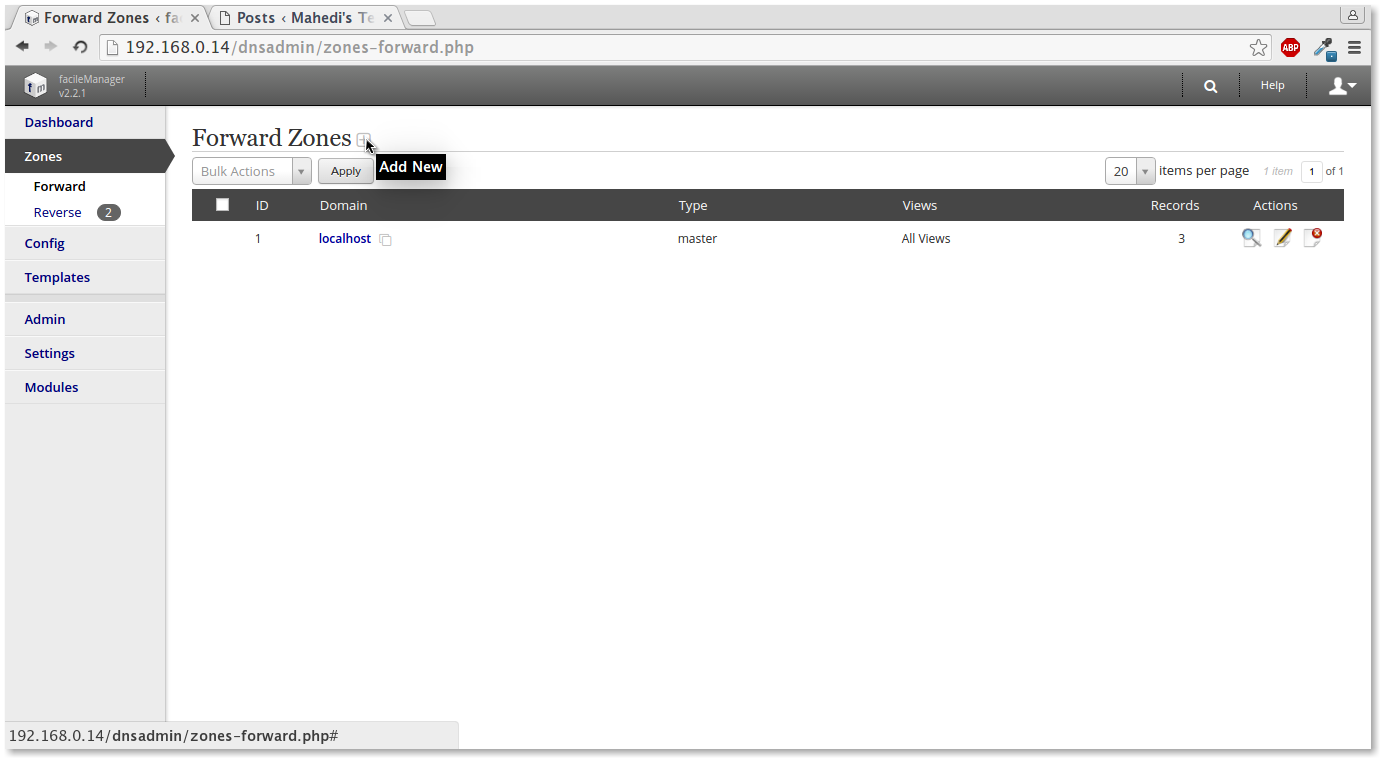
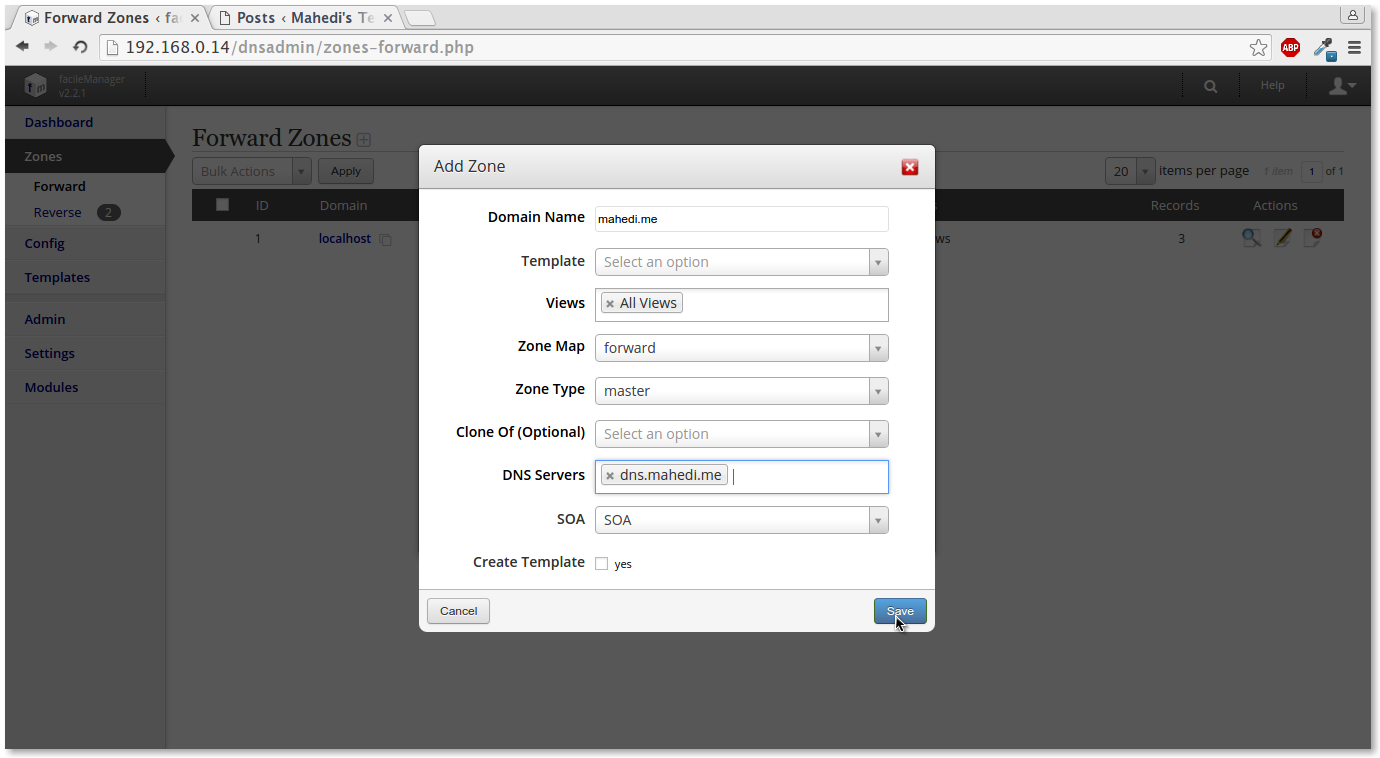
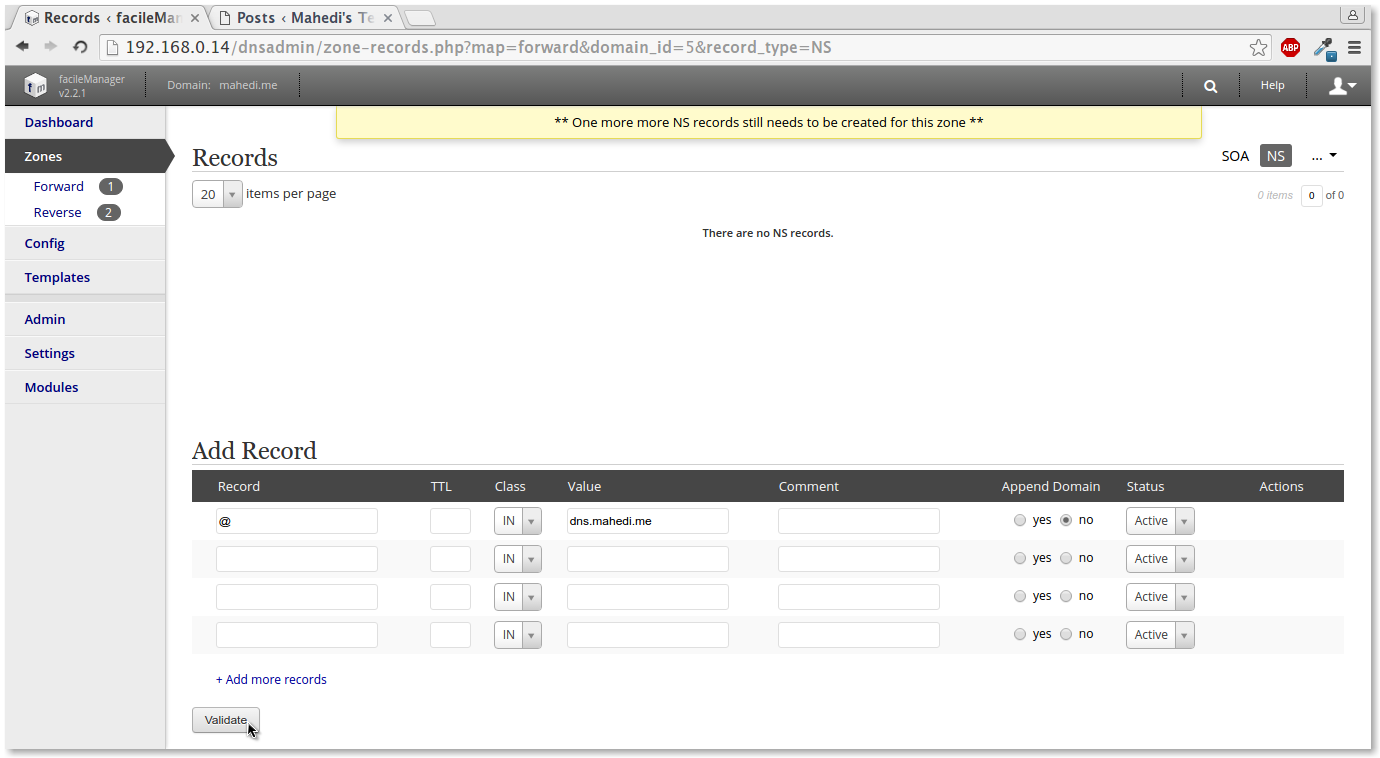
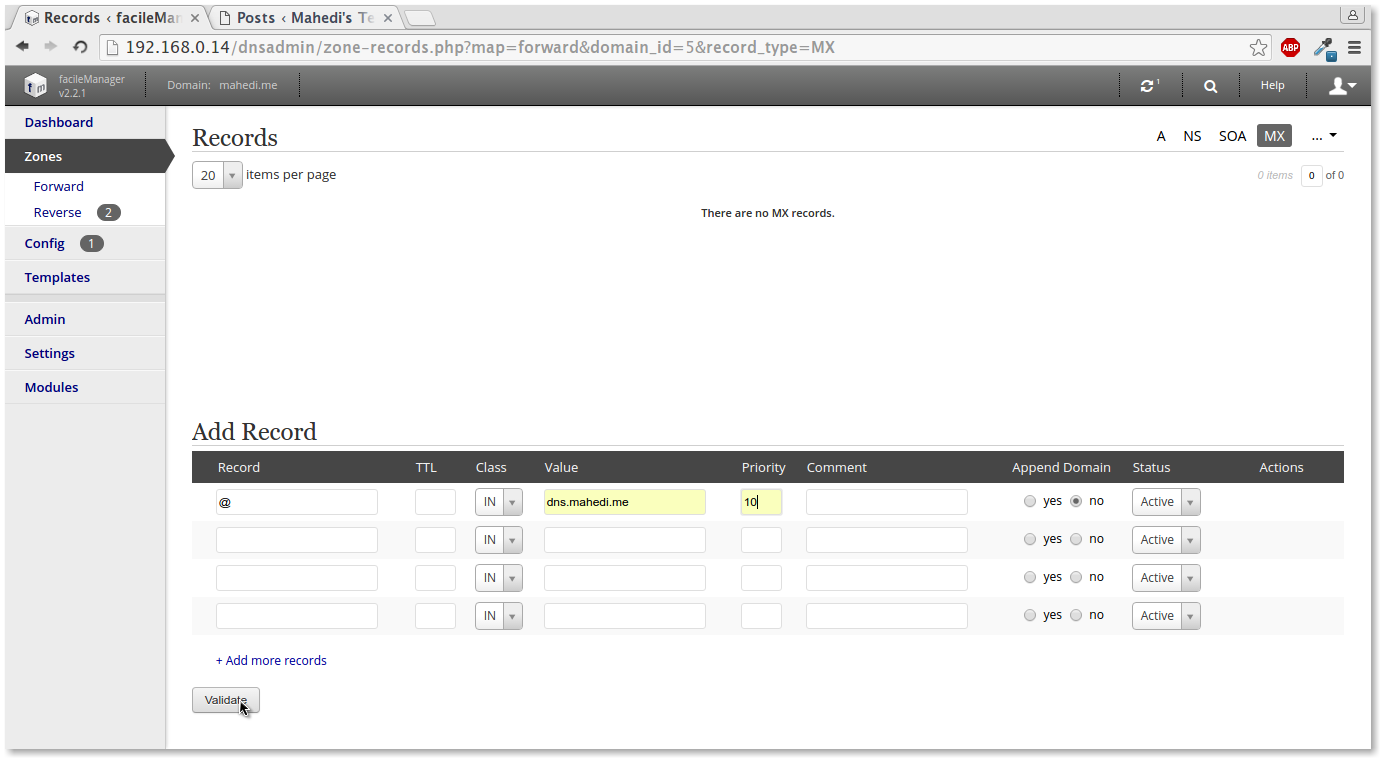
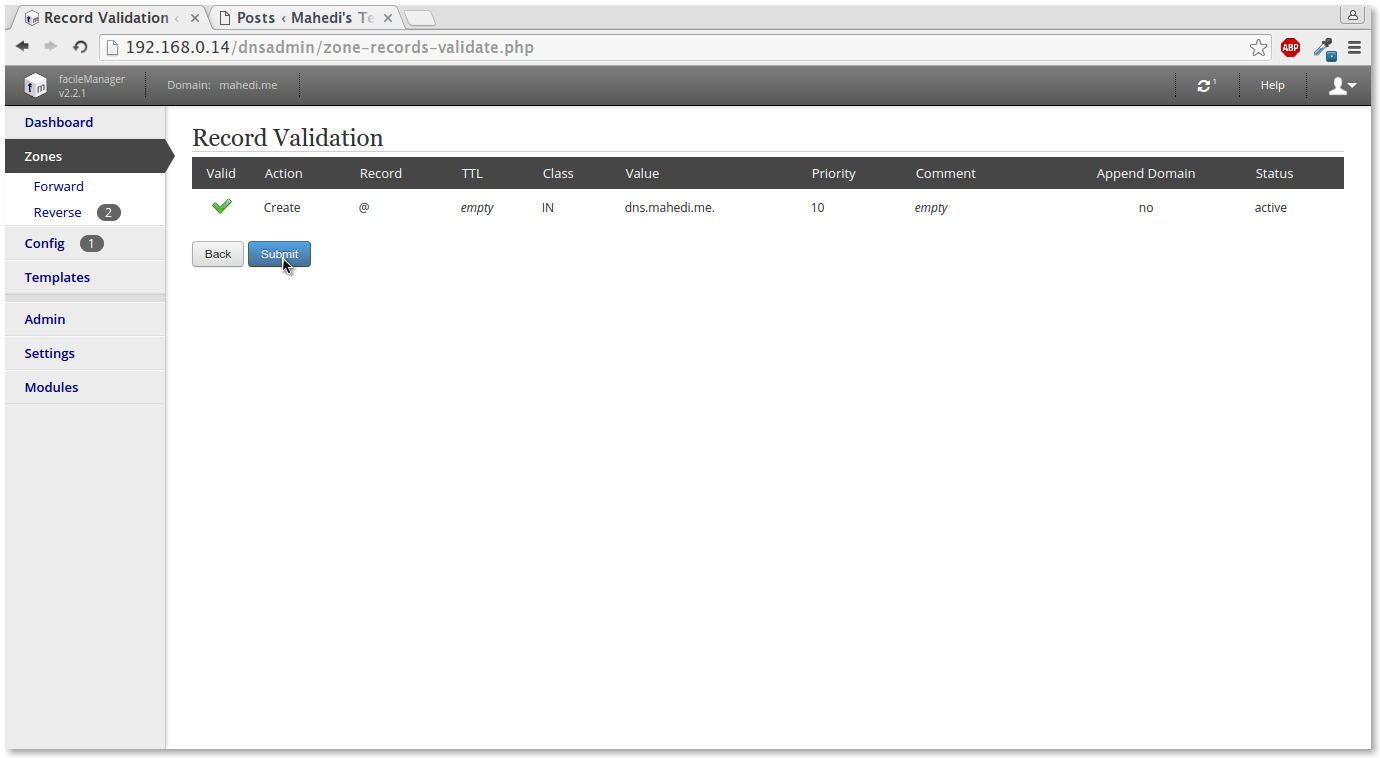
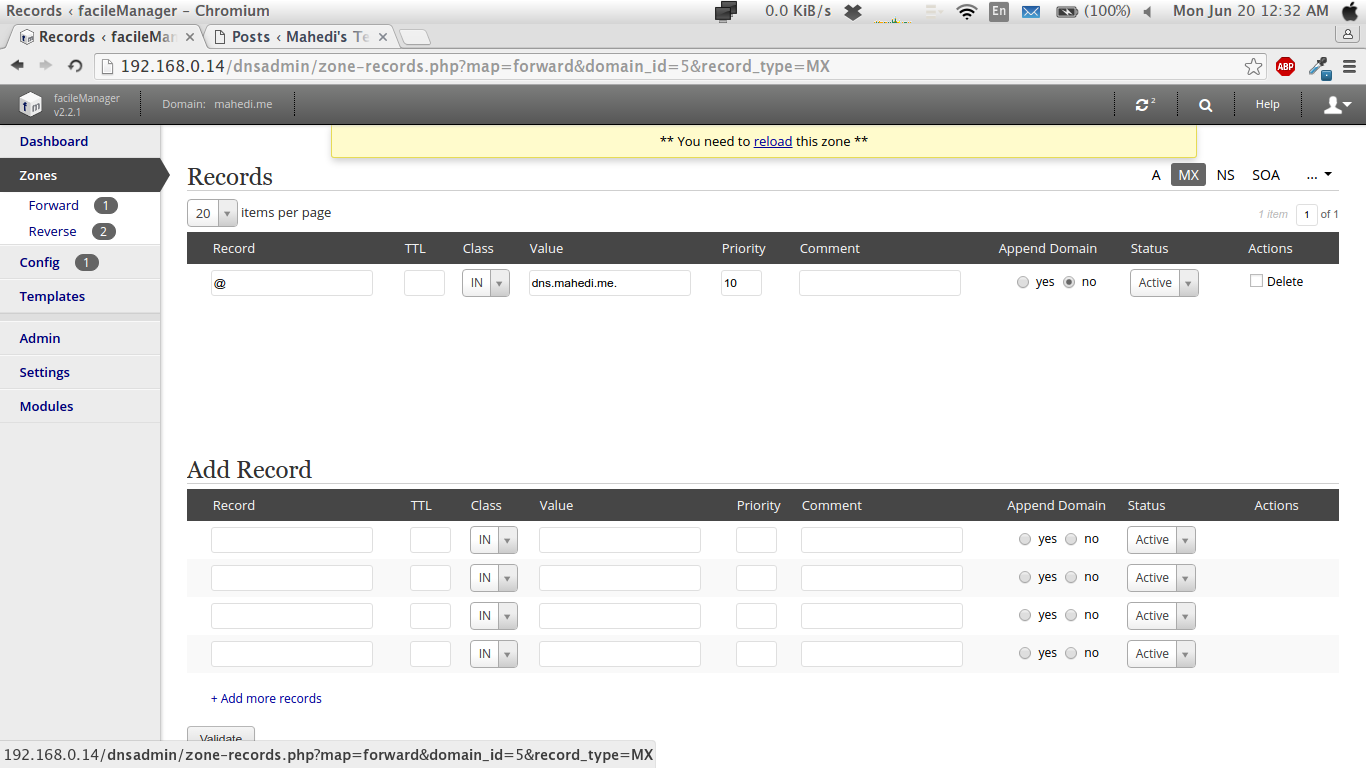
16. Domain Name System (DNS) Server
– Introduction of Domain Name System (DNS)
– Install DNS software
– Configure Resolver (Recursive) DNS Server
– Configure Authoritative Name Server for the Domain
– Configure Authoritative Name Server for the IP Block
– Configure Secondary DNS Server
17. Web Application Administration
– Install and Configure Apache Webserver
– Configure server for multiple domains
– Install and Configure php for Webserver
– Install and Configure MySQL Database server
– Install and Configure phpMyAdmin for MySQL Server Administration
– Install and Configure SSL to enable HTTPs
– Configure a WordPress CMS site
– Configure a Laravel site
18. Email System Administration
– Install and Configure Postfix SMTP server
– Install and Configure Dovecote IMAP & PoP server
– Install and Configure Mail Client (Thunderbird, Outlook)
– Install and Configure Webmail (Roundcube)
19. System Monitoring and Management
– Install & Configure Web System Monitoring Tools
– Install & Configure Log analyzer
– Install & Configure Log watch
– Install & Configure Webadmin tools
20. Configure Development Environment
– Install & Configure Android Studio
– Install & Configure Sublime Test
– Install & Configure vScode
– Install & Configure LAMP Stack
21. Cloud Computing
– Introduction of Cloud Computing
– Services of AWS, Azure, Google Cloud
– AWS ec2 Lab demonstration
22. DevOps and Automation
– DevOps Basic
– Docker Basic
– Run a webservice with Docker
– Automation with Ansible basic
– Ansible Lab


How to install DNS dig tool in Windows

Dig Tool কি?

Dig হলো DNS সার্ভারের অপারেশন এবং টেস্টিং এর জন্য সর্বাধিক ফিচার সম্বলিত একটি টুল যার সাহায্যে DNS সকল অপারেশন এর সকল ধরনের টেস্টিং করা যায়। Internet Systems Consortium (ISC)কতৃক প্রদত্ত DNS সফটওয়্যার BIND (Berkeley Internet Name Domain) এর সংগে সংযুক্ত থাকে।

এই টুলটি System Administrator, Network Administrator এবং DNS Administrator দের জন্য খুবই প্রয়োজনীয় একটি টুল।

এখন কথা হলো এই টুলটি আমরা কিভাবে ব্যবহার করতে পারি। Windows এবং Linux উভয় সিস্টেমেই DNS Check করার জন্যে nslookup টুলটি ডিফল্টভাবে ইন্সটল করা থাকে, তবে লিনাক্স সিস্টেমে DNS এর সফটওয়্যারগুলো অপারেটিং সিস্টেমের প্যাকেজের মধ্যে দেয়া থাকে বিধায় bind সফটওয়্যারটি অপারেটিং সিস্টেম ইন্সটল করার সময় সিলেক্ট থাকলেই Dig টুল কাজ করে, অথবা yum install bind কমান্ডটি দিয়ে সহজেই ইন্সটল করে নেয়া যায় কিন্তু Windows অপারেটিং সিস্টেমে আলাদাভাবে bind সফটওয়্যারটি ডাউনলোড করে ইন্সটল করতে হয়।

এখানে আমি দেখাবো Windows অপারেটিং সিস্টেমে কিভাবে Dig টুল ইন্সটল করতে হয়। Dig টুলটি যেহেতু DNS সিস্টেম সফটওয়্যার BIND এর একটি টেস্টিং টুল তার জন্য আমাদের bind সফটওয়্যারটি ডাউনলোড করে ইন্সটল করতে হবে। নিচে কয়টি ধাপে এই ইন্সটল পক্রিয়া দেখানো হলোঃ

ধাপ-১: এই লিংক  http://www.isc.org/downloads  থেকে ডাউনলোড অপশন থেকে BIND সফটওয়্যারটি ডাউনলোড করতে হবে।

এবার আপনার সিস্টেমের আর্কিটেকচার অনুযায়ী 64-Bit অথবা 32-Bit সিলেক্ট করে সেভ করুন।

ধাপ-২ঃ Download হয়ে গেলে সেভ লকেশন থেকে Zip ফাইলটি Extract করে একটি ফোল্ডারে সেভ করুন। এবং সেখান থেকে BINDInstall.exe ফাইলটিতে রাইট বাটন দিয়ে “Run as administrator” Option সিলেক্ট করে রান করুন।

ধাপ-৩ঃ এবার নিচের চিত্রের ন্যায় Target Directory  তে “C:\Program Files\dig” এবং Options এর মধ্যে “Tools Only” চেক করে বাকি গুলা আনচেক করে Install এ ক্লিক করুন।

Installation এর সময় যদি আপনার পিসিতে “Microsoft Visual C++ Redistribution” প্যাকেজটি Install করা না থাকে তাহলে Install করে নিতে হবে। অথবা নিচের চিত্রের ন্যায় “Repair” এ ক্লিক করুন।

এরপর Install Successfull দেখাবে।

এখন আপনার পিসিতে BIND Dig tool সফল্ভাবে  Install হয়েছে। এখন Command Prompt থেকে Dig কমান্ডটি পাওয়ার জন্যে নিচের চিত্রের ন্যায় একটি Environment Variable সেট করতে হবে।

এবার Command Prompt থেকে সহজেই dig Command টি ব্যবহার করে DNS যাবতীয় কুয়েরী পরীক্ষা করতে পারবেন।

পরবর্তী পর্বে থাকছে DNS Dig Command এর ব্যবহার নিয়ে বিষদ আলোচনা।

DNS System- Concepts, Installation and Basic Configurations

DNS কি?

Domain Name System (DNS) এমন একটি ডিস্ট্রিবিউটেড হায়ারারকিক্যাল সিস্টেম, যার সাহায্য ছাড়া বর্তমান ইন্টারনেট কল্পনাও করা যায়না। ইন্টারনেট মূলতঃ বিশ্বব্যাপী একে অপরের সাথে সংযুক্ত একটি কম্পিউটার নেটওয়ার্ক ব্যবস্থাপনা সিস্টেম, যেখানে ডিভাইস সমূহের মধ্যে সংযোগ স্থাপন এবং যোগাযোগ এর জন্যে আইপি এড্রেস নামক এক প্রকার এড্রেস ব্যবহার করা হয়। ইন্টারনেট-এ সকল ধরনের ডাটা আদান প্রদান এই আইপি- এড্রেস এর মাধ্যমে হয়ে থাকে। কিন্তু একজন সাধারণ ব্যবহারকারীর নিকট ইন্টারনেট ব্যবহারের জন্য আইপি-এড্রেস মনেরাখা একটি দুরহ ব্যাপার। এ জন্য ইন্টারনেট কমোনিউকেশন সহজলভ্য করতে এমন একটি প্রযুক্তি ডেভেলপ করা হয় যার নাম হলো Domain Name System (DNS)। এর দারা কমিউনিকেশন এর সময় বিভিন্ন ধরনের নাম ব্যবহার করা হয় যা DNS সার্ভার এর মাধ্যমে স্বয়ংক্রিয়ভাবে আইপি-এড্রেস এ পরিবর্তিত হয়ে  ক্লায়েন্ট এবং সার্ভার এর মধ্যে যোগাযোগ সম্পন্ন করে।

এখানে ব্যবহৃত নামকে ডোমেইন নেইম (Domain Name) বলা হয়ে থাকে, আর একটি Domain Name System (DNS) দুই ধরনের কাজ করে থাকে, ডোমেইন নেইম (Domain Name) কে পরিবর্তন করে আইপি-এড্রেস দিয়ে থাকে যাকে ফরওয়ার্ড রিজলভ  এবং আইপি-এড্রেস এর পরিবর্তে ডোমেইন নেইম (Domain Name) দিয়ে থাকে যাকে রিভার্স রিজলভ বলা হয়ে থাকে।

DNS কম্পোনেন্টঃ

১। DNS Resolver:

এটি ক্লায়েন্ট এর হয়ে কাজ করে। যখন ক্লায়েন্ট একটি ডোমেইন এর নির্দিষ্ট সার্ভিসের জন্য তার DNS সার্ভার কে রিকোয়েস্ট পাঠায় DNS Resolver তখন আইপি-এড্রেস এর জন্য নেম সার্ভার (NS) এর নিকট DNS রিকোয়েস্ট কুয়েরী পাঠায়। আমরা ইন্টারনেট ব্যবহারের জন্য এই কম্পোনেন্টটি বেশী ব্যাবহার করে থাকি।

২। Name Servers (NS):

একটি ডোমেইন এর Information যে সার্ভার এ store করা থাকে তাকে ওই ডোমেইন এর Name Server বলা হয়। একটি ডোমেইন এর যাবতীয় Information তার Name Serverএ store করা থাকে।

৩।  Resource Records (RR):

Name Serverএ store করা একটি ডোমেইন প্রত্যেকটি সার্ভিস (web, mail, smtp etc.) এর Information কেই Resource Records (RR) বলে।

 DNS কিভাবে কাজ করে?

আমরা আগেই জেনেছি Domain Name System (DNS) একটি ডিস্ট্রিবিউটেড হায়ারারকিক্যাল সিস্টেম, যেখানে অনেকগুলো সিস্টেম এর সমন্বয়ে এর কর্মপ্রক্রিয়া সম্পন্ন করে থাকে। এখানে আমরা কর্মপ্রক্রিয়ার ধাপগুলো নিয়ে বিস্তারিত আলোচনা করবো।

ধাপ-১: এখানে একজন ব্যবহারকারী যখন তার ব্রাউজারে একটি URL (ডোমেইন নেইম) ব্রাউজ করার জন্যে রিকোয়েস্ট করবে, রিকোয়েস্ট টি উক্ত ডিভাইস (পিসি, ল্যাপটপ, মোবাইল ডিভাইস) এর DNS Resolver এর নিকট আইপি-এড্রেস এর জন্য ফরওয়ার্ড করবে

ধাপ-২: DNS Resolver সার্ভার রিকোয়েস্টটিকে রুট সার্ভার এর নিকট ফরওয়ার্ড করবে (২)। রুট সার্ভার ডোমেইন নেইম টাইপ (.com, .org, .net, .edu, .bd etc.) এর উপর ভিত্তি করে DNS Resolver কে ডোমেইন এর নির্দিষ্ট Top Level Domain Name Server (TLD NS) এর এড্রেসটি জানিয়ে দিবে (৩)।

ধাপ-৩: DNS Resolver সার্ভার ওই ডোমেইন এর Top Level Domain Name Server (TLD NS) সার্ভার এর সঙ্গে যোগাযোগ করবে এবং ডোমেইনটির ইনফরমেশন চাইবে (৪)। Top Level Domain Name Server (TLD NS) সার্ভার ওই ডোমেইন এর নেম সার্ভার (NS) এর এড্রেসটি জানিয়ে দিবে (৫)।

ধাপ-৪: DNS Resolver সার্ভার ওই ডোমেইন এর নির্দিষ্ট সার্ভিস (web, mail, smtp etc.) এর জন্যে ওই ডোমেইন এর নেম সার্ভার (NS) এর সংগে যোগাযোগ করবে (৬)। নেম সার্ভার (NS) ওই সার্ভিস এর জন্যে আইপি-এড্রেস (www.google.com IP:172.217.26.206) প্রদান করবে (৭)।

ধাপ-৫: এবার DNS Resolver সার্ভার ক্লায়েন্ট কে ওই নির্দিষ্ট সার্ভিস এর আইপি-এড্রেস (www.google.com IP:172.217.26.206) প্রদান করবে (৮)। ক্লায়েন্ট উক্ত সার্ভিস এর জন্যে সার্ভিস এর আইপি-এড্রেস (www.google.com IP:172.217.26.206) এ যোগাযোগ করবে (৯)। এভাবে DNS Resolving প্রক্রিয়া সম্পন্ন করবে।

DNS সার্ভার এর প্রকারভেদঃ

কার্যপ্রণালী গত পার্থক্যঃ

১। Authoritative-Only DNS Servers: যে DNS সার্ভার তার ডাটাবেস এ রক্ষিত ডোমেইন এর Information ব্যতীত অন্য কোন ডোমেইন এর রিকোয়েস্ট কুয়েরী Accept করেনা তাকে Authoritative-Only DNS Servers বলা হয়। কোন ডোমেইন এর Name Server ই ওই ডোমেইন এর Authoritative DNS Server আর এটি যদি অন্য কোন ডোমেইন এর রিকোয়েস্ট কুয়েরী Accept না করে তখন এটিকে Authoritative-Only DNS Servers বলা হবে।

২। Caching-Only or Caching DNS Server: DNS Resolver সার্ভার কেই Caching-Only or Caching DNS Server বলা হয়। Caching DNS Server এ কোন ডোমেইন এর Information থাকেনা। এটি DNS রিকোয়েস্ট কুয়েরীর মাধ্যমে Name Server থেকে বিভিন্ন ডোমেইন এর Information কালেক্ট করে ক্লায়েন্ট কে প্রদান করে থাকে। দ্রুত রিকোয়েস্ট resolve এর জন্য Frequent ব্রাউজ করা ডোমেইন গুলোর জন্যে একটি Cache ট্যাবল তৈরি করে নির্দিষ্ট সময় পর্যন্ত তথ্য সংরক্ষণ করে।

৩। Forwarding DNS Server: এটিও Caching-Only or Caching DNS Server মতই কাজ করে, তবে এটি Name Server সমূহের সংগে সরাসরি যোগাযোগ না করে সমস্ত DNS রিকোয়েস্ট গুলোকে একটি নির্দিষ্ট DNS Resolver সার্ভার এ ফরওয়ার্ড করে। এটিও দ্রুত রিকোয়েস্ট resolve এর জন্য Frequent ব্রাউজ করা ডোমেইন গুলোর জন্যে একটি Cache ট্যাবল তৈরি করে নির্দিষ্ট সময় পর্যন্ত তথ্য সংরক্ষণ করে।

৮। Hybrid DNS Server: Caching DNS এবং Authoritative DNS Server একই সার্ভার থেকে পরিচালিত হলে তাকে আমরা Hybrid DNS Server বলছে পাড়ি।

সম্পর্কগত পার্থক্যঃ

১। Primary or Master DNS Server: এটি একটি Authoritative DNS Server। একটি ডোমেইন এর Information এর Master ডাটাবেস এই সার্ভার এ সংরক্ষণ করা হয় এবং Resource Records (RR) গুলো এই সার্ভার থেকেই ডাটাবেস এ এন্ট্রি দেয়া হয়ে থাকে।

২। Secondary or Slave Servers: এটিও একটি Authoritative DNS Server। একটি ডোমেইন এর Information এর Replicate (Slave) ডাটাবেস এই সার্ভার এ সংরক্ষণ করা হয়। এই সার্ভার এ কোন Resource Records (RR) এন্ট্রি দেয়া হয়না, Master বা Primary সার্ভার থেকে পুল করে থাকে।

৩। Public vs. Private Servers: ইন্টারনেট এ যে কেউ যে সার্ভার এর ক্লায়েন্ট হতে পারে সেটাই Public Server যেমন 4.2.2.2, 8.8.8.8 বহুল ব্যবহৃত Public DNS Server যেগুলো Public DNS Resolver হিসেবে কাজ করছে। পক্ষান্তরে Private Server হলও যেখানে ক্লায়েন্টদের কে আগে থেকেই ডিফাইন করা থাকে যে, কে কে এই DNS এর ক্লায়েন্ট হতে পাড়বে।

DNS সার্ভার কনফিগারেশনঃ

DNS Server কনফিগারেশন জন্য আমাদের একটি সার্ভার প্রয়োজন যেটিতে CentOS অথবা RHEL 7 ইন্সটল করা থাকতে হবে। তারপর আমরা পরবর্তী ধাপ গুলো ফলো করে DNS Server কনফিগারেশন করবো।

১। Scenario: আমরা Primary এবং Secondary DNS সার্ভার কনফিগারেশন জন্য নিম্নোক্ত Scenario টি ব্যবহার করবো।

Primary DNS Server:
Hostname : ns1
Domain Name : mahedi.me
IP Address : 192.168.1.5

Secondary DNS Server:
Hostname : ns2
Domain Name : mahedi.me
IP Address : 192.168.1.10

2. কনফিগারেশন Firewall

ডিস্যাবল  SELinux:

# vim /etc/selinux/config

Set SELINUX=disabled

# This file controls the state of SELinux on the system.
# SELINUX= can take one of these three values:
# enforcing - SELinux security policy is enforced.
# permissive - SELinux prints warnings instead of enforcing.
# disabled - No SELinux policy is loaded.

SELINUX=disabled

# SELINUXTYPE= can take one of these two values:
# targeted - Targeted processes are protected,
# mls - Multi Level Security protection.
SELINUXTYPE=targeted

:x

এবার server টি reboot দিন।

# reboot

3. কনফিগারেশন Hostname:

বর্তমান hostname  টি দেখার জন্য

[root@localhost ~]# hostname

localhost.localdomain

hostname চেঞ্জ করার জন্য আমাদের /etc/hostname ফাইলটি Edit করতে হবে।

[root@localhost ~]# vim /etc/hostname
ns1.mahedi.me

:x

ইফেক্টটি দেখার জন্য সার্ভারটি থেকে একবার logout করে লগইন করতে হবে।

[root@localhost ~]# logout

Login:

[root@ns1 ~]#

এবার আমরা সার্ভার এর hosts টেবিল এ একটি এন্ট্রি দিবো।

[root@ns1 ~]# vim /etc/hosts

192.168.1.5        ns1.mahedi.me           ns1

:x

আমাদের Hostname কনফিগারেশন সঠিক হলও কিনা সেটি পরীক্ষা করার জন্য নিচের কমান্ড গুলো দিয়ে তার আউটপুট পরীক্ষা করবো।

root@ns1 ~]# hostname
ns1.mahedi.me
root@ns1 ~]# hostname –d
mahedi.me
root@ns1 ~]# hostname –f
ns1.mahedi.me

4. Software ইন্সটেলেশনঃ

DNS সার্ভার কনফিগারেশন আমরা bind একটি Software ব্যবহার করবো। এখন আমরা আমাদের সার্ভার এ bind Software টি install করা আছে কিনা সেটি পরীক্ষা করবো।

root@ns1 ~]# rpm –qa|grep bind
bind-9.8.2-0.17.rc1.el6_4.6.x86_64
bind-libs-9.8.2-0.17.rc1.el6_4.6.x86_64
bind-utils-9.8.2-0.17.rc1.el6_4.6.x86_64

আমার এখানে দেখতে পাচ্ছি Software গুলো আগে থেকেই install করা আছে। যদি install করা না থাকত বা না থাকে তাহলে আমরা নিচের কমান্ডটি ব্যবহার করে খুব সহজে Software গুলো install করে নিতে পারবো, সেক্ষেত্রে আপনার সার্ভার এ অবশ্যই ইন্টারনেট সংযোগ থাকতে হবে।

[root@ns1 ~]# yum install –y bind bind-utils

Loaded plugins: fastestmirror, security
Loading mirror speeds from cached hostfile
 * base: mirror.steadfast.net
 * epel: epel.mirror.angkasa.id
 * extras: mirror.steadfast.net
 * remi-php55: remi.mirror.ate.info
 * remi-safe: remi.mirror.ate.info
 * updates: mirror.steadfast.net

Setting up Install Process
Resolving Dependencies
Running transaction check
 Package bind.x86_64 32:9.8.2-0.47.rc1.el6 will be installed
 Package bind-devel.x86_64 32:9.8.2-0.47.rc1.el6 will be installed
 Package bind-libs.x86_64 32:9.8.2-0.47.rc1.el6 will be installed
 Package bind-utils.x86_64 32:9.8.2-0.47.rc1.el6 will be installed
 Finished Dependency Resolution

Dependencies Resolved

========================================================================
Package Arch Version Repository Size
========================================================================
Installing:
 bind x86_64 32:9.8.2-0.47.rc1.el6 base 4.0 M
 bind-devel x86_64 32:9.8.2-0.47.rc1.el6 base 383 k
 bind-libs x86_64 32:9.8.2-0.47.rc1.el6 base 889 k
 bind-utils x86_64 32:9.8.2-0.47.rc1.el6 base 187 k

Transaction Summary
========================================================================
Install 4 Package(s)

Total download size: 5.4 M
Installed size: 11 M
Downloading Packages:
(1/4): bind-9.8.2-0.47.rc1.el6.x86_64.rpm | 4.0 MB 00:09
(2/4): bind-devel-9.8.2-0.47.rc1.el6.x86_64.rpm | 383 kB 00:00
(3/4): bind-libs-9.8.2-0.47.rc1.el6.x86_64.rpm | 889 kB 00:02
(4/4): bind-utils-9.8.2-0.47.rc1.el6.x86_64.rpm | 187 kB 00:00
------------------------------------------------------------------------
Total 364 kB/s | 5.4 MB 00:15
Running rpm_check_debug
Running Transaction Test
Transaction Test Succeeded
Running Transaction
 Installing : 32:bind-libs-9.8.2-0.47.rc1.el6.x86_64 1/4
 Installing : 32:bind-devel-9.8.2-0.47.rc1.el6.x86_64 2/4
 Installing : 32:bind-9.8.2-0.47.rc1.el6.x86_64 3/4
 Installing : 32:bind-utils-9.8.2-0.47.rc1.el6.x86_64 4/4
 Verifying : 32:bind-libs-9.8.2-0.47.rc1.el6.x86_64 1/4
 Verifying : 32:bind-devel-9.8.2-0.47.rc1.el6.x86_64 2/4
 Verifying : 32:bind-9.8.2-0.47.rc1.el6.x86_64 3/4
 Verifying : 32:bind-utils-9.8.2-0.47.rc1.el6.x86_64 4/4

Installed:
 bind.x86_64 32:9.8.2-0.47.rc1.el6 bind-devel.x86_64 32:9.8.2-0.47.rc1.el6
 bind-libs.x86_64 32:9.8.2-0.47.rc1.el6 bind-utils.x86_64 32:9.8.2-0.47.rc1.el6
Complete!

5. Primary DNS সার্ভার কনফিগারেশনঃ

সার্ভার এ সঠিকভাবে Software গুলো install করা হলে আমরা কনফিগারেশন শুরু করবো। প্রথমেই আমরা কনফিগারেশন ফাইল (/etc/named.conf) এর একটি ব্যাকআপ নিব, যেন কনফিগারেশন এর সময় বা পরবর্তীতে কোন সমস্যা হলে সহজে রোল-ব্যাক করতে পারা যায়।

[root@ns1 ~]# cd /etc/
[root@ns1 etc]# cp named.conf named.conf.ori

এবার আমরা কনফিগারেশন শুরু করবো। এখানে আমি আমার Scenario (ডোমেইন নেইম, আইপি-এড্রেস) মত করে প্যারামিটার গুলো বসাবো আপনি যখন কনফিগার করবেন আপনার মত করে পরিবর্তন করে নিবেন। সবার বোঝার সুবিধার্থে নিম্নে কনফিগারেশন ফাইল এ পরিবর্তন-কৃত অংশ গুলোকে বোল্ড করে দিয়েছি।

[root@ns1 ~]# vim /etc/named.conf

options {
 listen-on port 53 { 192.168.1.5; };
 // listen-on-v6 port 53 { ::1; };

 directory "/var/named";
 dump-file "/var/named/data/cache_dump.db";
 statistics-file "/var/named/data/named_stats.txt";
 memstatistics-file "/var/named/data/named_mem_stats.txt";

 allow-query { any; };
 allow-recursion { localhost; 192.168.1.0/24; };

 dnssec-enable yes;
 dnssec-validation yes;

 /* Path to ISC DLV key */
 bindkeys-file "/etc/named.iscdlv.key";
 managed-keys-directory "/var/named/dynamic";
 pid-file "/run/named/named.pid";
 session-keyfile "/run/named/session.key";
};

logging {
 channel default_debug {
 file "data/named.run";
 severity dynamic;
 };
};

zone "." IN {
 type hint;
 file "named.ca";
};

// Adding forward zone
zone "mahedi.me" IN {
 type master;
 file "db.mahedi.me.for";
 allow-transfer { none; };
};

// Adding Reverse zone

zone "1.168.192.in-addr.arpa" IN {
 type master;
 file "db.1.168.192.in-addr.arpa";
 allow-transfer { none; };
};

include "/etc/named.rfc1912.zones";
include "/etc/named.root.key";
:x

এবার আমরা zone অংশে উল্লেখকৃত ডোমেইন গুলোর জন্য Database তৈরি করবো। Database গুলো বাই ডিফল্ট /var/named মধ্যে থাকে। Bind সফটওয়্যারটি Plain Text Database ব্যবহার করে থাকে। তার মানে একটি Plain Text ফাইলে নির্দিষ্ট Structure এ ডাটা গুলোকে এন্ট্রি করতে হবে। Database এর Structure বুঝার জন্য আমরা কিছু Sample Database ফাইল ব্যবহার করবো যেটি সার্ভার এ পূর্বে থেকে সংরক্ষিত থাকে। এখানে আমরা ফরওয়ার্ড জোন এর জন্যে named.localhost এবং রিভার্স জোন এর জন্য named.loopback ফাইল দুটিকে কে Sample Database ফাইল হিসেবে ব্যবহার করবো। এখন আমরা দেখে নিবো /var/named মধ্যে কি ফাইল আগে থেকে তৈরি করা থাকে!

[root@ns1 ~]# cd /var/named/

[root@ns1 named]# ls -la
drwxr-x---. 5 root named 4096 Jul 24 17:04 .
drwxr-xr-x. 23 root root 4096 Jul 24 17:04 ..
drwxrwx---. 2 named named 6 Jul 5 06:15 data
drwxrwx---. 2 named named 6 Jul 5 06:15 dynamic
-rw-r-----. 1 root named 2281 May 22 05:51 named.ca
-rw-r-----. 1 root named 152 Dec 15 2009 named.empty
-rw-r-----. 1 root named 152 Jun 21 2007 named.localhost
-rw-r-----. 1 root named 168 Dec 15 2009 named.loopback
drwxrwx---. 2 named named 6 Jul 5 06:15 slaves

এখন আমরা সহজেই ফরওয়ার্ড জোন এর জন্য named.localhost এবং রিভার্স জোন এর জন্য named.loopback ফাইল দুটিকে কপি করে আমাদের ডোমেইন এর Database এর জন্য দেয়া নামে পেস্ট করে আমাদের ডাটা গুলোকে এন্ট্রি দিবো।

[root@ns1 named]# cp named.localhost db.mahedi.me.for
[root@ns1 named]# cp named.loopback db.1.168.192.in-addr.arpa

এখন প্রথমে ফরওয়ার্ড জোন ফাইল db.mahedi.me.for টিকে এডিট করবো।

[root@ns1 named]# vim db.mahedi.me.for

$TTL 1D
@ IN SOA          ns1.mahedi.me.   root.mahedi.me. (
                                                   0 ; serial
                                                  1D ; refresh
                                                  1H ; retry
                                                  1W ; expire
                                                3H ) ; minimum

               NS  ns1.mahedi.me.
               A   192.168.1.5
ns1     IN     A   192.168.1.5
mail    IN     A   192.168.1.5
mahedi.me.      IN  MX    10    mail.mahedi.me.
www     IN     CNAME     ns1.mahedi.me.
ftp     IN     A         192.168.1.50


:x

একইভাবে এখন রিভার্স জোন এর জন্য db.1.168.192.in-addr.arpa ফাইলটিকে এডিট করবোঃ

[root@ns1 named]# vim db.1.168.192.in-addr.arpa

$TTL 1D

@        IN      SOA       ns1.mahedi.me.      root.mahedi.me. (
                                                       0 ; serial
                                                      1D ; refresh
                                                      1H ; retry
                                                      1W ; expire
                                                    3H ) ; minimum

                      NS   ns1.mahedi.me.
                      A    192.168.1.5

5          IN     PTR      ns1.mahedi.me.
50         IN     PTR      ftp.mahedi.me.

:x

এখন আমরা ফাইল দুটির ওনারশিপ এর গ্রুপটা চেঞ্জ করে named করে দিবো

[root@ns1 named]# chgrp named db.mahedi.me.for
[root@ns1 named]# chgrp named db.1.168.192.in-addr.arpa

এখন আমরা আমাদের কনফিগারেশন ফাইল এ structure গত কোন ভুল আছে কিনা সেটা নিম্নোক্ত কমান্ড এর মাধ্যকে পরীক্ষা করবোঃ

[root@ns1 named]# named-checkzone zone db.mahedi.me.for
zone zone/IN: loaded serial 0
OK

[root@ns1 named]# named-checkzone zone db.110.168.192.in-addr.arpa
zone zone/IN: loaded serial 0
OK

[root@ns1 named]# named-checkconf -z /etc/named.conf
zone localhost.localdomain/IN: loaded serial 0
zone localhost/IN: loaded serial 0
zone mahedi.me/IN: loaded serial 0
zone 1.0.0.127.in-addr.arpa/IN: loaded serial 0
zone 1.168.192.in-addr.arpa/IN: loaded serial 0

এখানে কোন ফাইলের সিনট্যাক্স এর কোন সমস্যা নেই, এখন আমরা সার্ভিস স্টার্ট করলেই আমাদের DNS সার্ভারটি কাজ করতে শুরু করবে।

[root@ns1 named]# systemctl restart named.service

সার্ভিসটি পরবর্তিতে সার্ভার পাওয়ার অফ অথবা রিবুট নিলেও যেন স্বয়ংক্রিয়ভাবে চালু হয় এ জন্য নিম্নোক্ত কমান্ডটি দিবো।

[root@ns1 named]# systemctl enable named.service
ln -s '/usr/lib/systemd/system/named.service' '/etc/systemd/system/multi-user.target.wants/named.service'

এখন আমাদের সার্ভারটি DNS সার্ভিস প্রদানের জন্য সম্পুর্ন তৈরি প্রথমে আমরা এই সার্ভার এর ক্লায়েন্ট হবো এবং এটিকে প্ররীক্ষা করবো। এখানে একটি লিনাক্স পিসি থেকে কিভাবে ক্লায়েন্ট হতে হয় সেটা দেখিয়েছি। উইন্ডোজ পিসি থেকে করতে চাইলে আইপি-এড্রেস কনফিগারেশন এ গিয়ে DNS সার্ভার এর যায়গায় আপনার DNS সার্ভার এর আইপি-এড্রেসটি দিলেই হবে।

[root@ns1 named]# vim /ete/reslov.conf

search mahedi.me
nameserver 192.168.1.5

:x

[root@ns1 named]#

এখন নিম্নোক্ত কমান্ড গুলো দিয়ে পরীক্ষা করবো। এখানে আমি nslookup টুলটি যেটা লিনাক্স  এবং উইন্ডোজ দুই সিস্টেম এ আছে। উইন্ডোজ পিসিতে Command Prompt থেকে nslookup টাইপ করলে একই রকম  উইন্ডো (>) আসবে।

[root@ns1 named]# nslookup

> mahedi.me
Server: 192.168.1.5
Address: 192.168.1.5#53

Name: mahedi.me
Address: 192.168.1.5
> www
Server: 192.168.1.5
Address: 192.168.1.5#53

www.mahedi.me canonical name = ns1.mahedi.me.

Name: ns1.mahedi.me
Address: 192.168.1.5

> 192.168.1.5
 Server: 192.168.1.5
 Address:192.168.1.5#53

5.1.168.192.in-addr.arpa name = ns1.mahedi.me.

> 
>exit

[root@ns1 named]#

আমাদের DNS সার্ভারটি সফলভাবে রান করেছে।

6. Secondary DNS সার্ভার কনফিগারেশনঃ

ইতোপুর্বে আমরা Secondary DNS সার্ভার নিয়ে অলোচনা করেছি, এর করফিগারেশন প্রাইমারি DNS সার্ভার এর মতই কিন্তু এখানে ডোমেইন এর ডাটাবেস গুলো তৈরি করতে হয়না। প্রাইমারি সার্ভার থেকে স্বয়ংক্রিয়ভাবে replicate করে store করে।

শুরুতেই আমরা আমাদের প্রাইমারি সার্ভার থেকে ডাটা স্বয়ংক্রিয়ভাবে replicate করতে পারে তার পারমিশন দিবো।  এর জন্য আমরা /etc/named.conf এর zone অংশে allow-transfer {  }; এ আমাদের secondary সার্ভার  আইপি-এড্রেস টি উল্লেখ করতে হবে।

// Adding forward zone

zone "mahedi.me" IN {
 type master;
 file "db.mahedi.me.for";
 allow-transfer { 192.168.1.10; };
};

// Adding Reverse zone

zone "1.168.192.in-addr.arpa" IN {
 type master;
 file "db.110.168.192.in-addr.arpa";
 allow-transfer { 192.168.1.10; };

};


:x

এরপরে ফরওয়ার্ড জোন ফাইল db.mahedi.me.for টিকে এডিট করে Secondary DNS সার্ভার এর Information Add করতে হবে।

[root@ns1 named]# vim db.mahedi.me.for

$TTL 1D
@ IN SOA          ns1.mahedi.me.   root.mahedi.me. (
                                                   0 ; serial
                                                  1D ; refresh
                                                  1H ; retry
                                                  1W ; expire
                                                3H ) ; minimum

               NS  ns1.mahedi.me.
               A   192.168.1.5
               NS  ns2.mahedi.me.                
               A   192.168.1.10
ns1     IN     A   192.168.1.5
ns2     IN     A   192.168.1.10
mail    IN     A   192.168.1.5
mahedi.me.      IN  MX    10    mail.mahedi.me.
www     IN     CNAME     ns1.mahedi.me.
ftp     IN     A         192.168.1.50


:x

একইভাবে এখন রিভার্স জোন এর জন্য db.1.168.192.in-addr.arpa ফাইলটিকে এডিট করবোঃ

[root@ns1 named]# vim db.1.168.192.in-addr.arpa

$TTL 1D

@        IN      SOA       ns1.mahedi.me.      root.mahedi.me. (
                                                       0 ; serial
                                                      1D ; refresh
                                                      1H ; retry
                                                      1W ; expire
                                                    3H ) ; minimum

               NS  ns1.mahedi.me.                
               A   192.168.1.5
               NS  ns2.mahedi.me.                
               A   192.168.1.10

5          IN     PTR      ns1.mahedi.me.
50         IN     PTR      ftp.mahedi.me.

:x

এবার আমরা secondary সার্ভার এ কনফিগার করবো। প্রথমে আমাদের প্রাইমারি সার্ভার এর ন্যায় secondary সার্ভার এ আইপি- এড্রেস, Firewall, Hostname কনফিগার করতে হবে, এর জন্য আমরা ১ থেকে ৪ নং ধাপ গুলো অনুসরণ করবো।

এখানেও আমাদের পূর্বের ন্যায় প্রথমেই আমরা কনফিগারেশন ফাইল (/etc/named.conf) এর একটি ব্যাকআপ নিব, যেন কনফিগারেশন এর সময় বা পরবর্তিতে কোন সমস্যা হলে সহজে রোলব্যাক করতে পারা যায়।

[root@ns1 ~]# cd /etc/
[root@ns1 etc]# cp named.conf named.conf.ori

এবার আমরা কনফিগারেশন শুরু করবো। আমি আগেই বলেছি এখানে আমি আমার Scenario (ডোমেইন নেইম, আইপি-এড্রেস) মত করে প্যারামিটার গুলো বসাবো আপনি যখন কনফিগার করবেন আপনার মত করে পরিবর্তন করে নিবেন। সবার বোঝার সুবিধার্থে নিম্নে কনফিগারেশন ফাইল এ পরিবর্তনকৃত অংশ গুলোকে বোল্ড করে দিয়েছি।

[root@ns2 ~]# vim /etc/named.conf

options {

 listen-on port 53 { 192.168.1.10; };

 // listen-on-v6 port 53 { ::1; };
 directory "/var/named";
 dump-file "/var/named/data/cache_dump.db";
 statistics-file "/var/named/data/named_stats.txt";
 memstatistics-file "/var/named/data/named_mem_stats.txt";

 allow-query { any;};
 allow-recursion { localhost; 192.168.1.0/24; };

 dnssec-enable yes;
 dnssec-validation yes;
 dnssec-lookaside auto;
 /* Path to ISC DLV key */
 bindkeys-file "/etc/named.iscdlv.key";
 managed-keys-directory "/var/named/dynamic";
};


logging {
 channel default_debug {
 file "data/named.run";
 severity dynamic;
 };
};


zone "." IN {
 type hint;
 file "named.ca";
};


// Adding forward zone

zone "mahedi.me" IN {
 type slave;
 masters { 192.168.1.5; };
 file "slaves/db.mahedi.me.for";
};


// Adding Reverse zone

zone "1.168.192.in-addr.arpa" IN {
 type slave;
 masters { 192.168.1.5; };
 file "slaves/db.1.168.192.in-addr.arpa";
};


include "/etc/named.rfc1912.zones";
include "/etc/named.root.key";

:x

এখন আমরা পূর্বের ন্যায় সার্ভিস স্টার্ট করবো স্টার্টাপ এ enable করবো।

[root@ns1 named]# systemctl restart named.service
[root@ns1 named]# systemctl enable named.service
ln -s '/usr/lib/systemd/system/named.service' '/etc/systemd/system/multi-user.target.wants/named.service'

এখন আমরা দেখব আমাদের  Secondary সার্ভার Primary সার্ভার থেকে ডাটা Replicate করতে পেড়েছে কিনা।

[root@ns2 ~]# cd /var/named/slaves/
[root@ns2 slaves]# ls -la
-rw-r----- 1 named named 421 May 27 21:37 db.mahedi.me.for
-rw-r----- 1 named named 292 May 13 13:58 db.110.168.192.in-addr.arpa

Yes!! we have done. আমাদের  Secondary সার্ভার Primary সার্ভার থেকে ডাটা Replicate করতে পেড়েছে!!

এখন আমরা  পূর্বের ন্যায় Secondary DNS সার্ভার এর ক্লায়েন্ট হব এবং nslookup  দিয়ে  পরীক্ষা করবো।

[root@n2 named]# nslookup
> mahedi.me
Server: 192.168.1.10
Address: 192.168.1.10#53
Name: mahedi.me
Address: 192.168.1.5
> www
Server: 192.168.1.10
Address: 192.168.1.10#53
www.mahedi.me canonical name = ns1.mahedi.me.
Name: ns1.mahedi.me
Address: 192.168.1.5
> 192.168.1.5
Server: 192.168.1.10
Address:192.168.1.10#53
5.1.168.192.in-addr.arpa name = ns1.mahedi.me.
>
>exit

[root@ns1 named]#


Enterprise Emailing System with Virtual Mail Hosting on CentOS 7.x/RHEL 7.x – (Postfix Dovecot ViMbAdmin MariaDB Roundcube Amavisd-new Spamassassin Clamav DKIM SPF)

Introduction

This is an advanced email server configuration. This configuration will allow you to serve multiple domains on one server. This how-to will allow you to setup a server that is one of four mail server types:

  • Mail server with spam and virus checking
  • Mail server w/o spam and virus checking
  • Backup MX / spam and virus filtering server
  • Backup MX (You want to receive and hold mail while your main server is down)

You will get the following features:

  • Postfix: MTA behind the mail receiving and sending
  • SMTP authentication
  • Secure SMTP using TLS
  • Dovecot: Imap and pop3 mailbox service
  • Secure IMAP and pop3
  • Server-side filtering of flagged spam to a spam folder
  • Mysql: handle all the virtual domains and users
  • ViMbAdmin: GUI for domain administration
  • RoundCube: webmail access
  • Spam/virus filtering using amavisd-new, SpamAssassin and ClamAV

Note: This tutorial divided into 7 part and Each part describe a unique feature. First, 3 part implement the system workable and rest of the 4 part will be added extra functionality with your system to meet enterprise goals.

Install and Configure MariaDB Server with phpMyAdmin on CentOS/RHEL 7.x

Install Packages:

[root@localhost ~]# yum install mariadb-server mariadb-client
Loaded plugins: fastestmirror
Loading mirror speeds from cached hostfile


Dependencies Resolved

================================================================================
 Package                     Arch       Version               Repository   Size
================================================================================
Installing:
 mariadb-server              x86_64     1:5.5.47-1.el7_2      updates      11 M
Installing for dependencies:
 libaio                      x86_64     0.3.109-13.el7        base         24 k
 mariadb                     x86_64     1:5.5.47-1.el7_2      updates     8.9 M
 perl-Compress-Raw-Bzip2     x86_64     2.061-3.el7           base         32 k
 perl-Compress-Raw-Zlib      x86_64     1:2.061-4.el7         base         57 k
 perl-DBD-MySQL              x86_64     4.023-5.el7           base        140 k
 perl-DBI                    x86_64     1.627-4.el7           base        802 k
 perl-IO-Compress            noarch     2.061-2.el7           base        260 k
 perl-Net-Daemon             noarch     0.48-5.el7            base         51 k
 perl-PlRPC                  noarch     0.2020-14.el7         base         36 k
Updating for dependencies:
 mariadb-libs                x86_64     1:5.5.47-1.el7_2      updates     755 k

Transaction Summary
================================================================================
Install  1 Package  (+9 Dependent packages)
Upgrade             ( 1 Dependent package)

Total download size: 22 M
Is this ok [y/d/N]: y 
Downloading packages:
Delta RPMs disabled because /usr/bin/applydeltarpm not installed.
(1/11): libaio-0.3.109-13.el7.x86_64.rpm                   |  24 kB   00:00     
(2/11): mariadb-libs-5.5.47-1.el7_2.x86_64.rpm             | 755 kB   00:01     
(3/11): perl-Compress-Raw-Bzip2-2.061-3.el7.x86_64.rpm     |  32 kB   00:00     
(4/11): perl-Compress-Raw-Zlib-2.061-4.el7.x86_64.rpm      |  57 kB   00:15     
(5/11): perl-DBI-1.627-4.el7.x86_64.rpm                    | 802 kB   00:16     
(6/11): perl-DBD-MySQL-4.023-5.el7.x86_64.rpm              | 140 kB   00:16     
(7/11): perl-IO-Compress-2.061-2.el7.noarch.rpm            | 260 kB   00:01     
(8/11): perl-Net-Daemon-0.48-5.el7.noarch.rpm              |  51 kB   00:00     
(9/11): perl-PlRPC-0.2020-14.el7.noarch.rpm                |  36 kB   00:00     
(10/11): mariadb-5.5.47-1.el7_2.x86_64.rpm                 | 8.9 MB   00:23     
(11/11): mariadb-server-5.5.47-1.el7_2.x86_64.rpm          |  11 MB   00:24     
--------------------------------------------------------------------------------
Total                                             840 kB/s |  22 MB   00:26     
Running transaction check
Running transaction test
Transaction test succeeded
Running transaction
  Updating   : 1:mariadb-libs-5.5.47-1.el7_2.x86_64                        1/12 
  Installing : 1:mariadb-5.5.47-1.el7_2.x86_64                             2/12 
  Installing : libaio-0.3.109-13.el7.x86_64                                3/12 
  Installing : perl-Compress-Raw-Bzip2-2.061-3.el7.x86_64                  4/12 
  Installing : 1:perl-Compress-Raw-Zlib-2.061-4.el7.x86_64                 5/12 
  Installing : perl-IO-Compress-2.061-2.el7.noarch                         6/12 
  Installing : perl-Net-Daemon-0.48-5.el7.noarch                           7/12 
  Installing : perl-PlRPC-0.2020-14.el7.noarch                             8/12 
  Installing : perl-DBI-1.627-4.el7.x86_64                                 9/12 
  Installing : perl-DBD-MySQL-4.023-5.el7.x86_64                          10/12 
  Installing : 1:mariadb-server-5.5.47-1.el7_2.x86_64                     11/12 
  Cleanup    : 1:mariadb-libs-5.5.35-3.el7.x86_64                         12/12 
  Verifying  : perl-DBD-MySQL-4.023-5.el7.x86_64                           1/12 
  Verifying  : perl-Net-Daemon-0.48-5.el7.noarch                           2/12 
  Verifying  : perl-PlRPC-0.2020-14.el7.noarch                             3/12 
  Verifying  : 1:perl-Compress-Raw-Zlib-2.061-4.el7.x86_64                 4/12 
  Verifying  : 1:mariadb-libs-5.5.47-1.el7_2.x86_64                        5/12 
  Verifying  : perl-Compress-Raw-Bzip2-2.061-3.el7.x86_64                  6/12 
  Verifying  : 1:mariadb-server-5.5.47-1.el7_2.x86_64                      7/12 
  Verifying  : libaio-0.3.109-13.el7.x86_64                                8/12 
  Verifying  : perl-DBI-1.627-4.el7.x86_64                                 9/12 
  Verifying  : perl-IO-Compress-2.061-2.el7.noarch                        10/12 
  Verifying  : 1:mariadb-5.5.47-1.el7_2.x86_64                            11/12 
  Verifying  : 1:mariadb-libs-5.5.35-3.el7.x86_64                         12/12 

Installed:
  mariadb-server.x86_64 1:5.5.47-1.el7_2                                        

Dependency Installed:
  libaio.x86_64 0:0.3.109-13.el7                                                
  mariadb.x86_64 1:5.5.47-1.el7_2                                               
  perl-Compress-Raw-Bzip2.x86_64 0:2.061-3.el7                                  
  perl-Compress-Raw-Zlib.x86_64 1:2.061-4.el7                                   
  perl-DBD-MySQL.x86_64 0:4.023-5.el7                                           
  perl-DBI.x86_64 0:1.627-4.el7                                                 
  perl-IO-Compress.noarch 0:2.061-2.el7                                         
  perl-Net-Daemon.noarch 0:0.48-5.el7                                           
  perl-PlRPC.noarch 0:0.2020-14.el7                                             

Dependency Updated:
  mariadb-libs.x86_64 1:5.5.47-1.el7_2                                          

Complete!

Start mariabd service

service mariadb start

or

systemctl start  mariadb.servic

If service started successfully try login mariadb console:

[root@localhost ~]# mysql
Welcome to the MariaDB monitor.  Commands end with ; or \g.
Your MariaDB connection id is 2
Server version: 5.5.47-MariaDB MariaDB Server

Copyright (c) 2000, 2015, Oracle, MariaDB Corporation Ab and others.

Type 'help;' or '\h' for help. Type '\c' to clear the current input statement.

MariaDB [(none)]> quit
Bye

Currently your server running completely unsecured. To protect your server with password and other parameter run mysql_secure_installation command and follow bellow tasks:

[root@localhost ~]# mysql_secure_installation 

/usr/bin/mysql_secure_installation: line 379: find_mysql_client: command not found

NOTE: RUNNING ALL PARTS OF THIS SCRIPT IS RECOMMENDED FOR ALL MariaDB
      SERVERS IN PRODUCTION USE!  PLEASE READ EACH STEP CAREFULLY!

In order to log into MariaDB to secure it, we'll need the current
password for the root user.  If you've just installed MariaDB, and
you haven't set the root password yet, the password will be blank,
so you should just press enter here.

Enter current password for root (enter for none): 
OK, successfully used password, moving on...

Setting the root password ensures that nobody can log into the MariaDB
root user without the proper authorisation.

Set root password? [Y/n] y
New password: <Type your root password here>
Re-enter new password: 
Password updated successfully!
Reloading privilege tables..
 ... Success!


By default, a MariaDB installation has an anonymous user, allowing anyone
to log into MariaDB without having to have a user account created for
them.  This is intended only for testing, and to make the installation
go a bit smoother.  You should remove them before moving into a
production environment.

Remove anonymous users? [Y/n] y
 ... Success!

Normally, root should only be allowed to connect from 'localhost'.  This
ensures that someone cannot guess at the root password from the network.

Disallow root login remotely? [Y/n] y
 ... Success!

By default, MariaDB comes with a database named 'test' that anyone can
access.  This is also intended only for testing, and should be removed
before moving into a production environment.

Remove test database and access to it? [Y/n] y
 - Dropping test database...
 ... Success!
 - Removing privileges on test database...
 ... Success!

Reloading the privilege tables will ensure that all changes made so far
will take effect immediately.

Reload privilege tables now? [Y/n] y
 ... Success!

Cleaning up...

All done!  If you've completed all of the above steps, your MariaDB
installation should now be secure.

Thanks for using MariaDB!

Now try login with user and password:

[root@localhost ~]# mysql -u root -p
Enter password:  < Enter your password here
Welcome to the MariaDB monitor.  Commands end with ; or \g.
Your MariaDB connection id is 11
Server version: 5.5.47-MariaDB MariaDB Server

Copyright (c) 2000, 2015, Oracle, MariaDB Corporation Ab and others.

Type 'help;' or '\h' for help. Type '\c' to clear the current input statement.

MariaDB [(none)]> 

Install phpMyAdmin:

Phpmyadmin is an opensource tool to manage MySQL database using web browser. it can perform almost all tasks such as creating,deleting,modifying databases,users,tables and fields .

Step 1: Add the EPEL Repository

phpMyAdmin is part of Extra Packages for Enterprise Linux (EPEL), which is a community repository of non-standard packages for the RHEL distribution. First, we’ll install the EPEL repository:

rpm -iUvh http://dl.fedoraproject.org/pub/epel/epel-release-latest-7.noarch.rpm
Retrieving http://dl.fedoraproject.org/pub/epel/epel-release-latest-7.noarch.rpm
warning: /var/tmp/rpm-tmp.tAUL8z: Header V3 RSA/SHA256 Signature, key ID 352c64e5: NOKEY
Preparing...                          ################################# [100%]
Updating / installing...
   1:epel-release-7-7                 ################################# [100%]

Step 2: Update repositories.

yum check-update

Step 3: Now install phpMyAdmin package along with dependencies.

yum -y install phpmyadmin

Step 4: Basic Configuration for phpMyAdmin

Open /etc/httpd/conf.d/phpMyAdmin.conf file ( Apache config file for phpmyadmin ) and edit as follows.

Find these lines . ( Found 2 times )

 # Apache 2.4
  Require ip 127.0.0.1
  Require ip ::1
     

Replace with

 # Apache 2.4
    # Require ip 127.0.0.1
    # Require ip ::1
    Require all granted

Step 5: Restart Apache service .

systemctl restart httpd.service

Now open http://serverIP/phpmyadmin in your browser. You can login using root as username and mysql root password.

Install DNS Server with fmDNS Graphical Interface on CentOS/RHEL 6.x/7.x

Description

Manage one or more ISC BIND DNS servers without having to login to each server to update zone or configuration files. Just make your changes and build the configs all from the web interface. With fmDNS, you can manage:

  • Zone files (A, AAAA, CNAME, PTR, TXT, SRV, NS records, and many more!)
  • named options
  • Views
  • ACLs
  • Keys
  • Logging channels and categories
  • Controls
  • DNSSEC keys and zones

Settings can be configured globally for all servers with individual server overrides for when your servers are all configured the same and when they are all unique. You can also import existing named-compatible zone files for faster data entry.

Server configuration and zone files can be updated via cron, http(s), or ssh.

DNS Server Details:

Hostname         : dns.mahedi.me
IP Address       : 192.168.0.14/24

1. Hostname Configuration

Edit /etc/sysconfig/network file to configure hostname:

vim /etc/sysconfig/network

and set such as:

NETWORKING=yes
HOSTNAME=dns.mahedi.me

For RHEL/CentOS-7 Edit /etc/hostname :

vim /etc/hostname

and set such as:

dns.mahedi.me

Edit the /etc/hosts file:

vim /etc/hosts

and set such as:

127.0.0.1       localhost.localdomain   localhost
192.168.0.14    dns.mahedi.me           dns

Check hostname with the following command and see the output:

[root@dns ~]# hostname 
dns.mahedi.me

[root@dns ~]# hostname -f 
dns.mahedi.me

[root@dns ~]# hostname -d
mahedi.me

2. Software Installation BIND name server

yum install bind bind-utils bind-devel bind-libs -y
 
Loaded plugins: fastestmirror, security
Loading mirror speeds from cached hostfile
 * base: mirror.steadfast.net
 * epel: epel.mirror.angkasa.id
 * extras: mirror.steadfast.net
 * remi-php55: remi.mirror.ate.info
 * remi-safe: remi.mirror.ate.info
 * updates: mirror.steadfast.net
Setting up Install Process
Resolving Dependencies
Running transaction check
 Package bind.x86_64 32:9.8.2-0.47.rc1.el6 will be installed
 Package bind-devel.x86_64 32:9.8.2-0.47.rc1.el6 will be installed
 Package bind-libs.x86_64 32:9.8.2-0.47.rc1.el6 will be installed
 Package bind-utils.x86_64 32:9.8.2-0.47.rc1.el6 will be installed
 Finished Dependency Resolution

Dependencies Resolved

======================================================================================
 Package           Arch           Version                      Repository       Size
======================================================================================
Installing:
 bind              x86_64         32:9.8.2-0.47.rc1.el6        base             4.0 M
 bind-devel        x86_64         32:9.8.2-0.47.rc1.el6        base             383 k
 bind-libs         x86_64         32:9.8.2-0.47.rc1.el6        base             889 k
 bind-utils        x86_64         32:9.8.2-0.47.rc1.el6        base             187 k

Transaction Summary
======================================================================================
Install       4 Package(s)

Total download size: 5.4 M
Installed size: 11 M

Downloading Packages:
(1/4): bind-9.8.2-0.47.rc1.el6.x86_64.rpm                         | 4.0 MB     00:09     
(2/4): bind-devel-9.8.2-0.47.rc1.el6.x86_64.rpm                   | 383 kB     00:00     
(3/4): bind-libs-9.8.2-0.47.rc1.el6.x86_64.rpm                    | 889 kB     00:02     
(4/4): bind-utils-9.8.2-0.47.rc1.el6.x86_64.rpm                   | 187 kB     00:00     
--------------------------------------------------------------------------------------
Total                                                    364 kB/s | 5.4 MB     00:15     
Running rpm_check_debug
Running Transaction Test
Transaction Test Succeeded
Running Transaction
  Installing : 32:bind-libs-9.8.2-0.47.rc1.el6.x86_64                            1/4 
  Installing : 32:bind-devel-9.8.2-0.47.rc1.el6.x86_64                           2/4 
  Installing : 32:bind-9.8.2-0.47.rc1.el6.x86_64                                 3/4 
  Installing : 32:bind-utils-9.8.2-0.47.rc1.el6.x86_64                           4/4 
  Verifying  : 32:bind-libs-9.8.2-0.47.rc1.el6.x86_64                            1/4 
  Verifying  : 32:bind-devel-9.8.2-0.47.rc1.el6.x86_64                           2/4 
  Verifying  : 32:bind-9.8.2-0.47.rc1.el6.x86_64                                 3/4 
  Verifying  : 32:bind-utils-9.8.2-0.47.rc1.el6.x86_64                           4/4 

Installed:
  bind.x86_64 32:9.8.2-0.47.rc1.el6           bind-devel.x86_64 32:9.8.2-0.47.rc1.el6          
  bind-libs.x86_64 32:9.8.2-0.47.rc1.el6      bind-utils.x86_64 32:9.8.2-0.47.rc1.el6          

Complete!

3. Creating database and user

[root@dns ~]# mysql -u root -p
Enter password: 

CREATE DATABASE dns;
CREATE USER 'dnsadmin'@'localhost' IDENTIFIED BY 'Password';
GRANT ALL PRIVILEGES ON dns.* TO 'dnsadmin'@'localhost';
flush privileges;
quit

4. Download packages:

[root@dns ~]# cd /opt 
[root@dns opt]# wget http://www.facilemanager.com/download/facilemanager-complete-2.2.1.tar.gz 
[root@dns opt]# tar -zxvf facilemanager-complete-2.2.1.tar.gz 
[root@dns opt]# cp -r /opt/facileManager/server/ /var/www/html/dnsadmin

5. Change ownership and permission:

[root@dns opt]# chown apache -R /var/www/html/dnsadmin
[root@dns opt]# chmod 755 -R /var/www/html/dnsadmin

6. Configure the web server:

[root@dns ~]# vim /etc/httpd/conf.d/dnsadmin.conf
Alias /dnsadmin /var/www/html/dnsadmin

<Directory /var/www/html/dnsadmin/>

 Options FollowSymLinks
 AllowOverride All

# For Apache = 2.3:
 Order allow,deny
 allow from all

 # For Apache = 2.4
 # Require all granted 
</Directory>

And restart web services

service httpd restart

Now open the browser give your URL (HTTP://<your address>/dnsadmin/) and follow the next steps:

Step-1: Give database credential and press submit:


Step-2: Press continue to create database schema:

Step-4: Press continue

Step-5: Create admin user and give credential for admin user and press submit

Step-6: Now it’s done! Press next to login  panel

Step-7: Activate fmDNS module in module section:

Step-8:  Now load fmDNS module from right-top corner option menu:

Step-9: It’s done! fmDNS loaded successfully.  Now install the client and configure your domain.

7. Clients Installation

At first copy /opt/facileManager/client/facileManager to /usr/local/ and run php /usr/local/facileManager/fmDNS/client.php install

[root@dns ~]# cp -r /opt/facileManager/client/facileManager /usr/local/
[root@dns ~]# php /usr/local/facileManager/fmDNS/client.php install 
Welcome to the fmDNS installer.

Please answer the following questions and the necessary configurations will be
performed for you.

Please enter the location of the facileManager interface:
 Examples include:
 fm.mydomain.com
 fm.mydomain.com:8443
 mydomain.com/fm
 http://fm.mydomain.com/facileManager

Please enter the location of the facileManager interface:

Now give your web-UI access URL: http://192.168.0.14/dnsadmin/

 
Please enter the location of the facileManager interface: http://192.168.0.14/dnsadmin/
  --> Testing 192.168.0.14 via https...failed
  --> Testing 192.168.0.14 via http...ok
  --> Checking account details...Success

Just press enter or give a serial number for zone update:

Please enter the serial number for dns.mahedi.me (or leave blank to create new):

  --> Generating new serial number: 562003234
  --> Adding dns.mahedi.me to the database...Success
  --> Running version tests...ok

  --> Tests complete.  Continuing installation.

Select the update method how server gets the update from web UI (available methods are cron, ssh, or http(s) [c|s|h]) give “c” for cron its work fine for me.

Will dns.mahedi.me get updates via cron, ssh, or http(s) [c|s|h]? c
  --> The crontab has been created.

Configuration file has been saved.

Installation is complete. Please login to the UI to ensure the server settings
are correct.

It’s seen fine. Let’s Add server in UI:

Click Enable button to enable server:


Then click Build configuration to initialize  the server:

It’s done. Your UI interface ready communicate with your server and configure your domain in web UI and automatically update in your server.

!Note: Any changed in configuration file in your server will be modified in every 5 minute from the configuration of database. So for every update and modification done in web interface not in configuration files stored in server.

Zone Creation:

At first, we need to create SOA template that would help you instead of put SOA information every time for every zone.

Create the zone for your domain:


Check configuration:

Edit /etc/resolve.conf file and set your server address in Linux client machine:

search mahedi.me
nameserver 192.168.0.14

Now check with different tools. Most famous DNS check tools are nslookup and dig. nslookup is preinstalled in windows and Linux.

[root@dns ~]# nslookup 
> mahedi.me
Server:		192.168.0.14
Address:	192.168.0.14#53

Name:	mahedi.me
Address: 192.168.0.14
> set type=any
> mahedi.me
Server:		192.168.0.14
Address:	192.168.0.14#53

mahedi.me
	origin = dns.mahedi.me
	mail addr = admin.mahedi.me
	serial = 2016061903
	refresh = 7200
	retry = 3600
	expire = 1209600
	minimum = 86400
mahedi.me	nameserver = dns.mahedi.me.
mahedi.me	mail exchanger = 10 dns.mahedi.me.
Name:	mahedi.me
Address: 192.168.0.14
> 192.168.0.14
Server:		192.168.0.14
Address:	192.168.0.14#53

14.0.168.192.in-addr.arpa	name = dns.mahedi.me.

Check configuration with dig tools:

[root@dns ~]# dig  mahedi.me +all

; <<>> DiG 9.8.2rc1-RedHat-9.8.2-0.47.rc1.el6 <<>> mahedi.me +all
;; global options: +cmd
;; Got answer:
;; ->>HEADER<

;; OPT PSEUDOSECTION:
; EDNS: version: 0, flags:; udp: 512
;; QUESTION SECTION:
;mahedi.me.                     IN      A

;; ANSWER SECTION:
mahedi.me.              14399   IN      A       192.168.0.14

;; Query time: 1015 msec
;; SERVER: 192.168.0.14#53(192.168.0.14)
;; WHEN: Fri Jan 19 03:16:02 Bangladesh Standard Time 2016
;; MSG SIZE  rcvd: 54

Install ViMbAdmin for Postfix Virtual Mail Administration tool on CentOS/RHEL 6.x/7.x

Virtual Mailbox Administration

The ViMbAdmin project (vim-be-admin) provides a web-based virtual mailbox administration system to allow mail administrators to easily manage domains, mailboxes, and aliases.

ViMbAdmin was written in PHP using our own web application framework which includes the Zend Framework, the Doctrine ORM and the Smarty templating system with JQuery and Bootstrap.

Project Link: https://github.com/opensolutions/ViMbAdmin

Install required packages and dependencies:

yum install php-cgi php-mcrypt php-memcache php-mysql php-json memcached git subversion git

PHP composer can be installed via:

cd /tmp
wget https://getcomposer.org/installer
php installer
mv composer.phar /usr/local/bin/composer

Set the timezone in /etc/php.ini  such as:

date.timezone="Asia/Dacca"

and restart apache

service httpd restart

Installation

Log into the server where you wish to install ViMbAdmin. In this document, I am going to assume your install path is /var/www/html/vimbadmin I will reference this using. $INSTALL_PATH You can thus copy and paste commands if you set the following appropriately:

export INSTALL_PATH='/var/www/html/vimbadmin'

You can install ViMbAdmin in a number of ways. In all cases you need PHP Composer installed (see requirements above).

  1. Via PHP Composer:
    composer create-project opensolutions/vimbadmin $INSTALL_PATH -s dev

    Some time you dependency error for php like:

    Running composer as root/super user is highly discouraged as packages, plugins and scripts cannot always be trusted
    Installing opensolutions/vimbadmin (dev-master dfc782e8d7fc0f525bf6fc7b4f17626a73611924)
     - Installing opensolutions/vimbadmin (dev-master master)
     Cloning master
    
    Created project in /var/www/html/vimbadmin
    Loading composer repositories with package information
    Installing dependencies (including require-dev) from lock file
    Your requirements could not be resolved to an installable set of packages.
    
    Problem 1
     - Installation request for doctrine/cache v1.6.0 -> satisfiable by doctrine/cache[v1.6.0].
     - doctrine/cache v1.6.0 requires php ~5.5|~7.0 -> your PHP version (5.4.16) does not satisfy that requirement.
     Problem 2
     - Installation request for doctrine/common v2.6.1 -> satisfiable by doctrine/common[v2.6.1].
     - doctrine/common v2.6.1 requires php ~5.5|~7.0 -> your PHP version (5.4.16) does not satisfy that requirement.
     Problem 3
     - doctrine/common v2.6.1 requires php ~5.5|~7.0 -> your PHP version (5.4.16) does not satisfy that requirement.
     - doctrine/dbal v2.5.4 requires doctrine/common >=2.4,<2.7-dev -> satisfiable by doctrine/common[v2.6.1].
     - Installation request for doctrine/dbal v2.5.4 -> satisfiable by doctrine/dbal[v2.5.4].

    To resolve this type of error install required PHP version on your system and run the command again:

    [root@ns1 vimbadmin]# composer install --dev
    Running composer as root/super user is highly discouraged as packages, plugins and scripts cannot always be trusted
    You are using the deprecated option "dev". Dev packages are installed by default now.
    Loading composer repositories with package information
    Installing dependencies (including require-dev) from lock file
     - Installing doctrine/lexer (v1.0.1)
     Downloading: 100%
    
    - Installing doctrine/inflector (v1.1.0)
     Downloading: 100%
    
    - Installing doctrine/collections (v1.3.0)
     Downloading: 100%
    
    - Installing doctrine/cache (v1.6.0)
     Downloading: 100%
    
    - Installing doctrine/annotations (v1.2.7)
     Downloading: 100%
    
    - Installing doctrine/common (v2.6.1)
      Downloading: 100%
    
    - Installing symfony/polyfill-mbstring (v1.2.0)
     Downloading: 100%
    
    - Installing symfony/console (v2.8.7)
     Downloading: 100%
    
    - Installing doctrine/dbal (v2.5.4)
     Downloading: 100%
    
    - Installing doctrine/orm (v2.4.8)
     Downloading: 100%
    
    - Installing zendframework/zendframework1 (1.12.18)
     Downloading: 100%
    
    - Installing komola/bootstrap-zend-framework (dev-master f81b60c)
     Cloning f81b60c1f477f4fbe4266b6d811a3eff9491f285
    
    - Installing opensolutions/minify (1.0.0)
     Downloading: 100%
    
    - Installing opensolutions/oss-framework (dev-master b3d669a)
     Cloning b3d669a81f8214032a70e594472ece9fe9322fe2
    
    - Installing smarty/smarty (v3.1.29)
     Downloading: 100%
    
    symfony/console suggests installing psr/log (For using the console logger)
    symfony/console suggests installing symfony/event-dispatcher ()
    symfony/console suggests installing symfony/process ()
    doctrine/orm suggests installing symfony/yaml (If you want to use YAML Metadata Mapping Driver)
    Generating autoload files

    At the end of this process, the composer will ask you:

    Do you want to remove the existing VCS (.git, .svn..) history?*

    Choose no.

  2. Via Git clone:
    git clone https://github.com/opensolutions/ViMbAdmin.git $INSTALL_PATH
    cd $INSTALL_PATH
    composer install --dev
  3. Via tarball (this method is discouraged as it will make updating more difficult): Find the latest release of ViMbAdmin from GitHub here. Find the URL of the tar.gz bundle and (changing filenames as appropriate):
    cd $(dirname $INSTALL_PATH)
    VIMBADMIN_VERSION=3.0.12
    wget https://github.com/opensolutions/ViMbAdmin/archive/${VIMBADMIN_VERSION}.tar.gz
    tar zxf ${VIMBADMIN_VERSION}.tar.gz
    mv ViMbAdmin-${VIMBADMIN_VERSION} $INSTALL_PATH
    cd $INSTALL_PATH
    composer install
    

File System Permissions

If you plan to run under Apache / another web server, ensure you set the ownership on the $INSTALL_PATH/var/directory appropriately.

chown -R apache $INSTALL_PATH/var

Database Setup

ViMbAdmin requires a backend database. We use the Doctrine2 DBAL and ORM so, in theory, any of the databases that Doctrine2 DBAL supports should work fine. We tend to use MySQL / MariaDB exclusively for testing and production so these instructions relate to that.

Log into your MySQL (or other) database and create a new user and database:

CREATE DATABASE vimbadmin;
GRANT ALL ON vimbadmin.* TO 'vimbadmin'@'localhost' IDENTIFIED BY 'password';
FLUSH PRIVILEGES;

Configuration

Vimbadmin ship a stock/reference configuration file. You need to copy this as follows:

cp $INSTALL_PATH/public/.htaccess.dist $INSTALL_PATH/public/.htaccess

cp $INSTALL_PATH/application/configs/application.ini.dist $INSTALL_PATH/application/configs/application.ini

You now need to set your database parameters in the $INSTALL_PATH/application/configs/application.inifile. You’ll find these near the top and here is an example:

resources.doctrine2.connection.options.driver = 'pdo_mysql'
resources.doctrine2.connection.options.dbname = 'vimbadmin'
resources.doctrine2.connection.options.user = 'vimbadmin'
resources.doctrine2.connection.options.password = 'password'
resources.doctrine2.connection.options.host = 'localhost'

Please see Configuration page and work your way through your andapplication.ini update the settings as appropriate. In particular, you need to configure a mail relay.

Database Creation

Now that your configuration is set and you have set up a database and user in MySQL, you need to create the database schema:

cd $INSTALL_PATH
./bin/doctrine2-cli.php orm:schema-tool:create

If all goes well, you should see:

$ ./bin/doctrine2-cli.php orm:schema-tool:create
ATTENTION: This operation should not be executed in a production environment.

Creating database schema…
Database schema created successfully!

Web Server Set-Up

Apache2

You need to tell Apache where to find ViMbAdmin and what URL it should be served under. In this example, we’re going to serve it from /vimbadmin (e.g. www.example.com/vimbadmin). As such, we create an Apache configuration block as follows on our web server:


Alias /vimbadmin /var/www/html/vimbadmin/public

<Directory /var/www/html/vimbadmin/public>
    Options FollowSymLinks
    AllowOverride FileInfo

    # For Apache <= 2.3:
    Order allow,deny
    allow from all

    # For Apache >= 2.4
    # Require all granted    
</Directory>

You may need to edit the above if you’re using a different URL or file system path.

Ensure mod_rewrite is enabled:

a2enmod rewrite

Restart Apache and you can now browse to your new installation.


Welcome to Your New ViMbAdmin Installation

You should now be greeted with a page welcoming you. If you didn’t set the security salt above, then the installer will provide random strings for these. Place this invimbadmin/application/configs/application.ini as instructed before continuing. If you did set it, then enter it in the Security Salt input box.

This is a security step to ensure that only the person performing the installation can create a super administrator.

Now enter a username (which must be an email address) and a password.

Once you click save, you’re done! Log in and work away.

Install Composer on CentOS

Composer is a tool for dependency management in PHP. It allows you to declare the dependent libraries your project needs and it will install them in your project for you.


First you have to go to the /tmp directory

cd /tmp

Download the composer.phar file

curl -sS https://getcomposer.org/installer | php

Move it to /usr/local/bin/

mv composer.phar /usr/local/bin/composer

How to Reallocate Disk Space Using LVM

1. See the Disks and Partition Status:

[root@288RHEL64S ~]# fdisk -l

Disk /dev/sda: 536.9 GB, 536870912000 bytes
255 heads, 63 sectors/track, 65270 cylinders
Units = cylinders of 16065 * 512 = 8225280 bytes
Sector size (logical/physical): 512 bytes / 512 bytes
I/O size (minimum/optimal): 512 bytes / 512 bytes
Disk identifier: 0x000946d2

   Device Boot      Start         End      Blocks   Id  System

/dev/sda1   *           1          64      512000   83  Linux

Partition 1 does not end on cylinder boundary.

/dev/sda2              64        6528    51915776   8e  Linux LVM

Disk /dev/mapper/VolGroup-lv_root: 49.0 GB, 48997859328 bytes
255 heads, 63 sectors/track, 5956 cylinders
Units = cylinders of 16065 * 512 = 8225280 bytes
Sector size (logical/physical): 512 bytes / 512 bytes
I/O size (minimum/optimal): 512 bytes / 512 bytes
Disk identifier: 0x00000000

Disk /dev/mapper/VolGroup-lv_swap: 4160 MB, 4160749568 bytes
255 heads, 63 sectors/track, 505 cylinders
Units = cylinders of 16065 * 512 = 8225280 bytes
Sector size (logical/physical): 512 bytes / 512 bytes
I/O size (minimum/optimal): 512 bytes / 512 bytes
Disk identifier: 0x00000000

2. See LVM Physical Volume Status using the following command:

[root@288RHEL64S ~]# pvs   
  PV         VG       Fmt  Attr PSize  PFree   
  /dev/sda2  VolGroup lvm2 a--  49.51g    0


[root@288RHEL64S ~]# pvscan
  PV /dev/sda2   VG VolGroup   lvm2 [49.51 GiB / 0    free]
  Total: 1 [49.51 GiB] / in use: 1 [49.51 GiB] / in no VG: 0 [0   ]


[root@288RHEL64S ~]# pvdisplay

  --- Physical volume ---
  PV Name               /dev/sda2
  VG Name               VolGroup
  PV Size               49.51 GiB / not usable 3.00 MiB
  Allocatable           yes (but full)
  PE Size               4.00 MiB
  Total PE              12674
  Free PE               0
  Allocated PE          12674
  PV UUID               UFthVT-S5ja-jQZ0-ZO27-9w5J-EfEV-o09WY


  1. See LVM Volume Group Status:
[root@288RHEL64S ~]# vgs

  VG       #PV #LV #SN Attr   VSize  VFree
  VolGroup   1   2   0 wz--n- 49.51g    0


 [root@288RHEL64S ~]# vgscan

  Reading all physical volumes.  This may take a while...
  Found volume group "VolGroup" using metadata type lvm2


[root@288RHEL64S ~]# vgdisplay

  --- Volume group ---
  VG Name               VolGroup
  System ID            
  Format                lvm2
  Metadata Areas        1
  Metadata Sequence No  3
  VG Access             read/write
  VG Status             resizable
  MAX LV                0
  Cur LV                2
  Open LV               2
  Max PV                0
  Cur PV                1
  Act PV                1
  VG Size               49.51 GiB
  PE Size               4.00 MiB
  Total PE              12674
  Alloc PE / Size       12674 / 49.51 GiB
  Free  PE / Size       0 / 0  
  VG UUID               u2twPp-Tk5E-A7AT-LpYu-gYCC-fGiF-LOcDKr
  1. See LVM Logical Volume Status
[root@288RHEL64S ~]# lvs

  LV      VG       Attr      LSize  Pool Origin Data%  Move Log Cpy%Sync Convert
  lv_root VolGroup -wi-ao--- 45.63g                                            
  lv_swap VolGroup -wi-ao---  3.88g


[root@288RHEL64S ~]# lvscan

  ACTIVE            '/dev/VolGroup/lv_root' [45.63 GiB] inherit
  ACTIVE            '/dev/VolGroup/lv_swap' [3.88 GiB] inherit


 [root@288RHEL64S ~]# lvdisplay

  --- Logical volume ---
  LV Path                /dev/VolGroup/lv_root
  LV Name                lv_root
  VG Name                VolGroup
  LV UUID                Hibr3Y-4BiB-qkPw-fob0-Bglb-ORP5-jfw1Jg
  LV Write Access        read/write
  LV Creation host, time localhost.localdomain, 2015-11-12 12:41:05 +0600
  LV Status              available
  # open                 1
  LV Size                45.63 GiB
  Current LE             11682
  Segments               1
  Allocation             inherit
  Read ahead sectors     auto
  - currently set to     256
  Block device           253:0

  --- Logical volume ---
  LV Path                /dev/VolGroup/lv_swap
  LV Name                lv_swap
  VG Name                VolGroup
  LV UUID                mX2PKI-mqyU-93Vi-gc0S-g8rM-eVwa-pFL8zT
  LV Write Access        read/write
  LV Creation host, time localhost.localdomain, 2015-11-12 12:41:16 +0600
  LV Status              available
  # open                 1
  LV Size                3.88 GiB
  Current LE             992
  Segments               1
  Allocation             inherit
  Read ahead sectors     auto
  - currently set to     256
  Block device           253:1

To create a new partition with free space of /dev/sda

[root@288RHEL64S yum.repos.d]# fdisk /dev/sda


WARNING: DOS-compatible mode is deprecated. It's strongly recommended to
         switch off the mode (command 'c') and change display units to
         sectors (command 'u').

Command (m for help):

Type m to see available command options:

Command (m for help): m

Command action
   a   toggle a bootable flag
   b   edit bsd disklabel
   c   toggle the dos compatibility flag
   d   delete a partition
   l   list known partition types
   m   print this menu
   n   add a new partition
   o   create a new empty DOS partition table
   p   print the partition table
   q   quit without saving changes
   s   create a new empty Sun disklabel
   t   change a partition's system id
   u   change display/entry units
   v   verify the partition table
   w   write table to disk and exit
   x   extra functionality (experts only)

Type p to see partition table:

Command (m for help): p

Disk /dev/sda: 536.9 GB, 536870912000 bytes
255 heads, 63 sectors/track, 65270 cylinders
Units = cylinders of 16065 * 512 = 8225280 bytes
Sector size (logical/physical): 512 bytes / 512 bytes
I/O size (minimum/optimal): 512 bytes / 512 bytes
Disk identifier: 0x000946d2

   Device Boot      Start         End      Blocks   Id  System
/dev/sda1   *           1          64      512000   83  Linux
Partition 1 does not end on cylinder boundary.
/dev/sda2              64        6528    51915776   8e  Linux LVM

Type n to create a new partition and type for e for extended or p for primary and given partition number 3 [Note: Here two partitions already existed that’s why number is 3]:

Command (m for help): n   

Command action
   e   extended
   p   primary partition (1-4)
p
Partition number (1-4): 3
First cylinder (6528-65270, default 6528):
Using default value 6528
Last cylinder, +cylinders or +size{K,M,G} (6528-65270, default 65270):
Using default value 65270

Type t and press enter to create or change partition type and given partition number (here 3) and hex code (here 8e for LVM partition):

Command (m for help): t
Partition number (1-4): 3
Hex code (type L to list codes): 8e
Changed system type of partition 3 to 8e (Linux LVM)

Type p to see change in partition table:

Command (m for help): p

Disk /dev/sda: 536.9 GB, 536870912000 bytes
255 heads, 63 sectors/track, 65270 cylinders
Units = cylinders of 16065 * 512 = 8225280 bytes
Sector size (logical/physical): 512 bytes / 512 bytes
I/O size (minimum/optimal): 512 bytes / 512 bytes
Disk identifier: 0x000946d2

   Device Boot      Start         End      Blocks   Id  System
/dev/sda1   *           1          64      512000   83  Linux
Partition 1 does not end on cylinder boundary.
/dev/sda2              64        6528    51915776   8e  Linux LVM
/dev/sda3            6528       65270   471852475   8e  Linux LVM

Finally type w and press enter to write change in the disk and exit from fdisk [Note: If you want quit without saving changes given q command and press enter ]:

Command (m for help): w

The partition table has been altered!

Calling ioctl() to re-read partition table.
WARNING: Re-reading the partition table failed with error 16: Device or resource busy.
The kernel still uses the old table. The new table will be used at
the next reboot or after you run partprobe(8) or kpartx(8)
Syncing disks.


[root@mahedi-rnd-vm ~]# pvcreate /dev/sda3

  Physical volume "/dev/sda3" successfully created


[root@mahedi-rnd-vm ~]# pvs

  PV         VG       Fmt  Attr PSize   PFree 
  /dev/sda2  VolGroup lvm2 a--   49.51g      0
  /dev/sda3           lvm2 a--  449.99g 449.99g


[root@mahedi-rnd-vm ~]# vgs

  VG       #PV #LV #SN Attr   VSize  VFree
  VolGroup   1   2   0 wz--n- 49.51g    0


[root@mahedi-rnd-vm ~]# vgextend VolGroup /dev/sda3

  Volume group "VolGroup" successfully extended


[root@mahedi-rnd-vm ~]# vgs

  VG       #PV #LV #SN Attr   VSize   VFree 
  VolGroup   2   2   0 wz--n- 499.50g 449.99g


[root@mahedi-rnd-vm ~]# pvs

  PV         VG       Fmt  Attr PSize   PFree 
  /dev/sda2  VolGroup lvm2 a--   49.51g      0
  /dev/sda3  VolGroup lvm2 a--  449.99g 449.99g


[root@mahedi-rnd-vm ~]# vgdisplay

  --- Volume group ---
  VG Name               VolGroup
  System ID            
  Format                lvm2
  Metadata Areas        2
  Metadata Sequence No  4
  VG Access             read/write
  VG Status             resizable
  MAX LV                0
  Cur LV                2
  Open LV               2
  Max PV                0
  Cur PV                2
  Act PV                2
  VG Size               499.50 GiB
  PE Size               4.00 MiB
  Total PE              127872
  Alloc PE / Size       12674 / 49.51 GiB
  Free  PE / Size       115198 / 449.99 GiB
  VG UUID               u2twPp-Tk5E-A7AT-LpYu-gYCC-fGiF-LOcDKr
[root@mahedi-rnd-vm ~]# lvextend -L +100G /dev/mapper/

control           VolGroup-lv_root  VolGroup-lv_swap


[root@mahedi-rnd-vm ~]# lvextend -L +100G /dev/mapper/VolGroup-lv_root

  Extending logical volume lv_root to 145.63 GiB
  Logical volume lv_root successfully resized


[root@mahedi-rnd-vm ~]# resize2fs /dev/VolGroup/lv_root

resize2fs 1.41.12 (17-May-2010)
Filesystem at /dev/VolGroup/lv_root is mounted on /; on-line resizing required
old desc_blocks = 3, new_desc_blocks = 10
Performing an on-line resize of /dev/VolGroup/lv_root to 38176768 (4k) blocks.
The filesystem on /dev/VolGroup/lv_root is now 38176768 blocks long.


[root@mahedi-rnd-vm ~]# df -H

Filesystem                       Size   Used  Avail Use% Mounted on
/dev/mapper/VolGroup-lv_root     154G   3.7G   143G   3% /
tmpfs                            2.1G   148k   2.1G   1% /dev/shm
/dev/sda1                        508M    39M   443M   9% /boot


[root@mahedi-rnd-vm ~]# vgdisplay

  --- Volume group ---
  VG Name               VolGroup
  System ID            
  Format                lvm2
  Metadata Areas        2
  Metadata Sequence No  5
  VG Access             read/write
  VG Status             resizable
  MAX LV                0
  Cur LV                2
  Open LV               2
  Max PV                0
  Cur PV                2
  Act PV                2
  VG Size               499.50 GiB
  PE Size               4.00 MiB
  Total PE              127872
  Alloc PE / Size       38274 / 149.51 GiB
  Free  PE / Size       89598 / 349.99 GiB
  VG UUID               u2twPp-Tk5E-A7AT-LpYu-gYCC-fGiF-LOcDKr


[root@mahedi-rnd-vm ~]# lvcreate -n lv_www -L 200G VolGroup

  Logical volume "lv_www" created


[root@mahedi-rnd-vm ~]# mkfs.ext4 /dev/VolGroup/lv_www

mke2fs 1.41.12 (17-May-2010)
Filesystem label=
OS type: Linux
Block size=4096 (log=2)
Fragment size=4096 (log=2)
Stride=0 blocks, Stripe width=0 blocks
13107200 inodes, 52428800 blocks
2621440 blocks (5.00%) reserved for the super user
First data block=0
Maximum filesystem blocks=4294967296
1600 block groups
32768 blocks per group, 32768 fragments per group
8192 inodes per group
Superblock backups stored on blocks:
     32768, 98304, 163840, 229376, 294912, 819200, 884736, 1605632, 2654208,
     4096000, 7962624, 11239424, 20480000, 23887872

Writing inode tables: done                           
Creating journal (32768 blocks): done
Writing superblocks and filesystem accounting information: done

This filesystem will be automatically checked every 31 mounts or
180 days, whichever comes first.  Use tune2fs -c or -i to override.